
My Quest to Build the Ultimate Hybrid Workstation for the 2020's
Making AI, CUDA, Windows games, Linux VMs, storage and server apps work on one machine: lessons learned from VFIO on the RTX 5090.

It's 2026 and tech is in this uniquely weird spot where AI seems to be both fueling demand for Harder, Better, Faster and Stronger gear, and at the same time its copious demand for hardware—namely memory—seems to be at the forefront of an outright crisis that's pricing consumers out of their gear. Apple's memory pricing in their Mac computers is now almost competitive. Yeah. That's how bad it has gotten.
Last year I decided to replace my two aging desktop machines (an Skylake-era gaming PC, and an 8th Gen headless system used as a server with Unraid). I wanted more powerful hardware to run more VMs and containers than my i7-8700K could support, as well as sufficient graphics compute to both play the latest games at 4K with high framerate or even WUHD (5120x2160) ultrawide resolution, and to experiment with CUDA and with the latest LLMs & ML-based tools; my once glorious GeForce GTX 1080 was no longer up to this task.
But given that almost all of my work nowadays happens on my portable MacBook Air, building two new systems—a home server for storage and compute, and a separate Windows one—didn't sit right with me.
A memory sprung to mind: back in 2015-2016, YouTube channels like LinusTechTips were covering the possibility of running a whole gaming PC (or even multiple ones) virtualized and using PCIe passthrough in Linux to play games at near-native performance. This futuristic computing paradigm, although not as popular today, still has resources such as Wendell's amazing Level1Techs YouTube channel and its related forum, as well as the very helpful r/VFIO community on Reddit and the Unraid Forums that are catering to it.
VFIO: the "What", "Why", & "How"
On Linux, GPU passthrough is achieved through VFIO (Virtual Function IO): a kernel driver that enables allocation of PCIe devices to virtual machines directly. When bound to VFIO, a PCIe device is no longer used by its now-unloaded Linux driver (as would be the NVIDIA or Radeon/Mesa graphics drivers), and is instead left in a "detached" state, until a correctly configured KVM virtual machine is launched (e.g. through QEMU), at which point the VFIO driver issues a PCIe Function-Level Reset, resulting in your (hopefully compatible) PCIe device resetting to a reset state and being ready to be initialized by the guest OS's kernel.
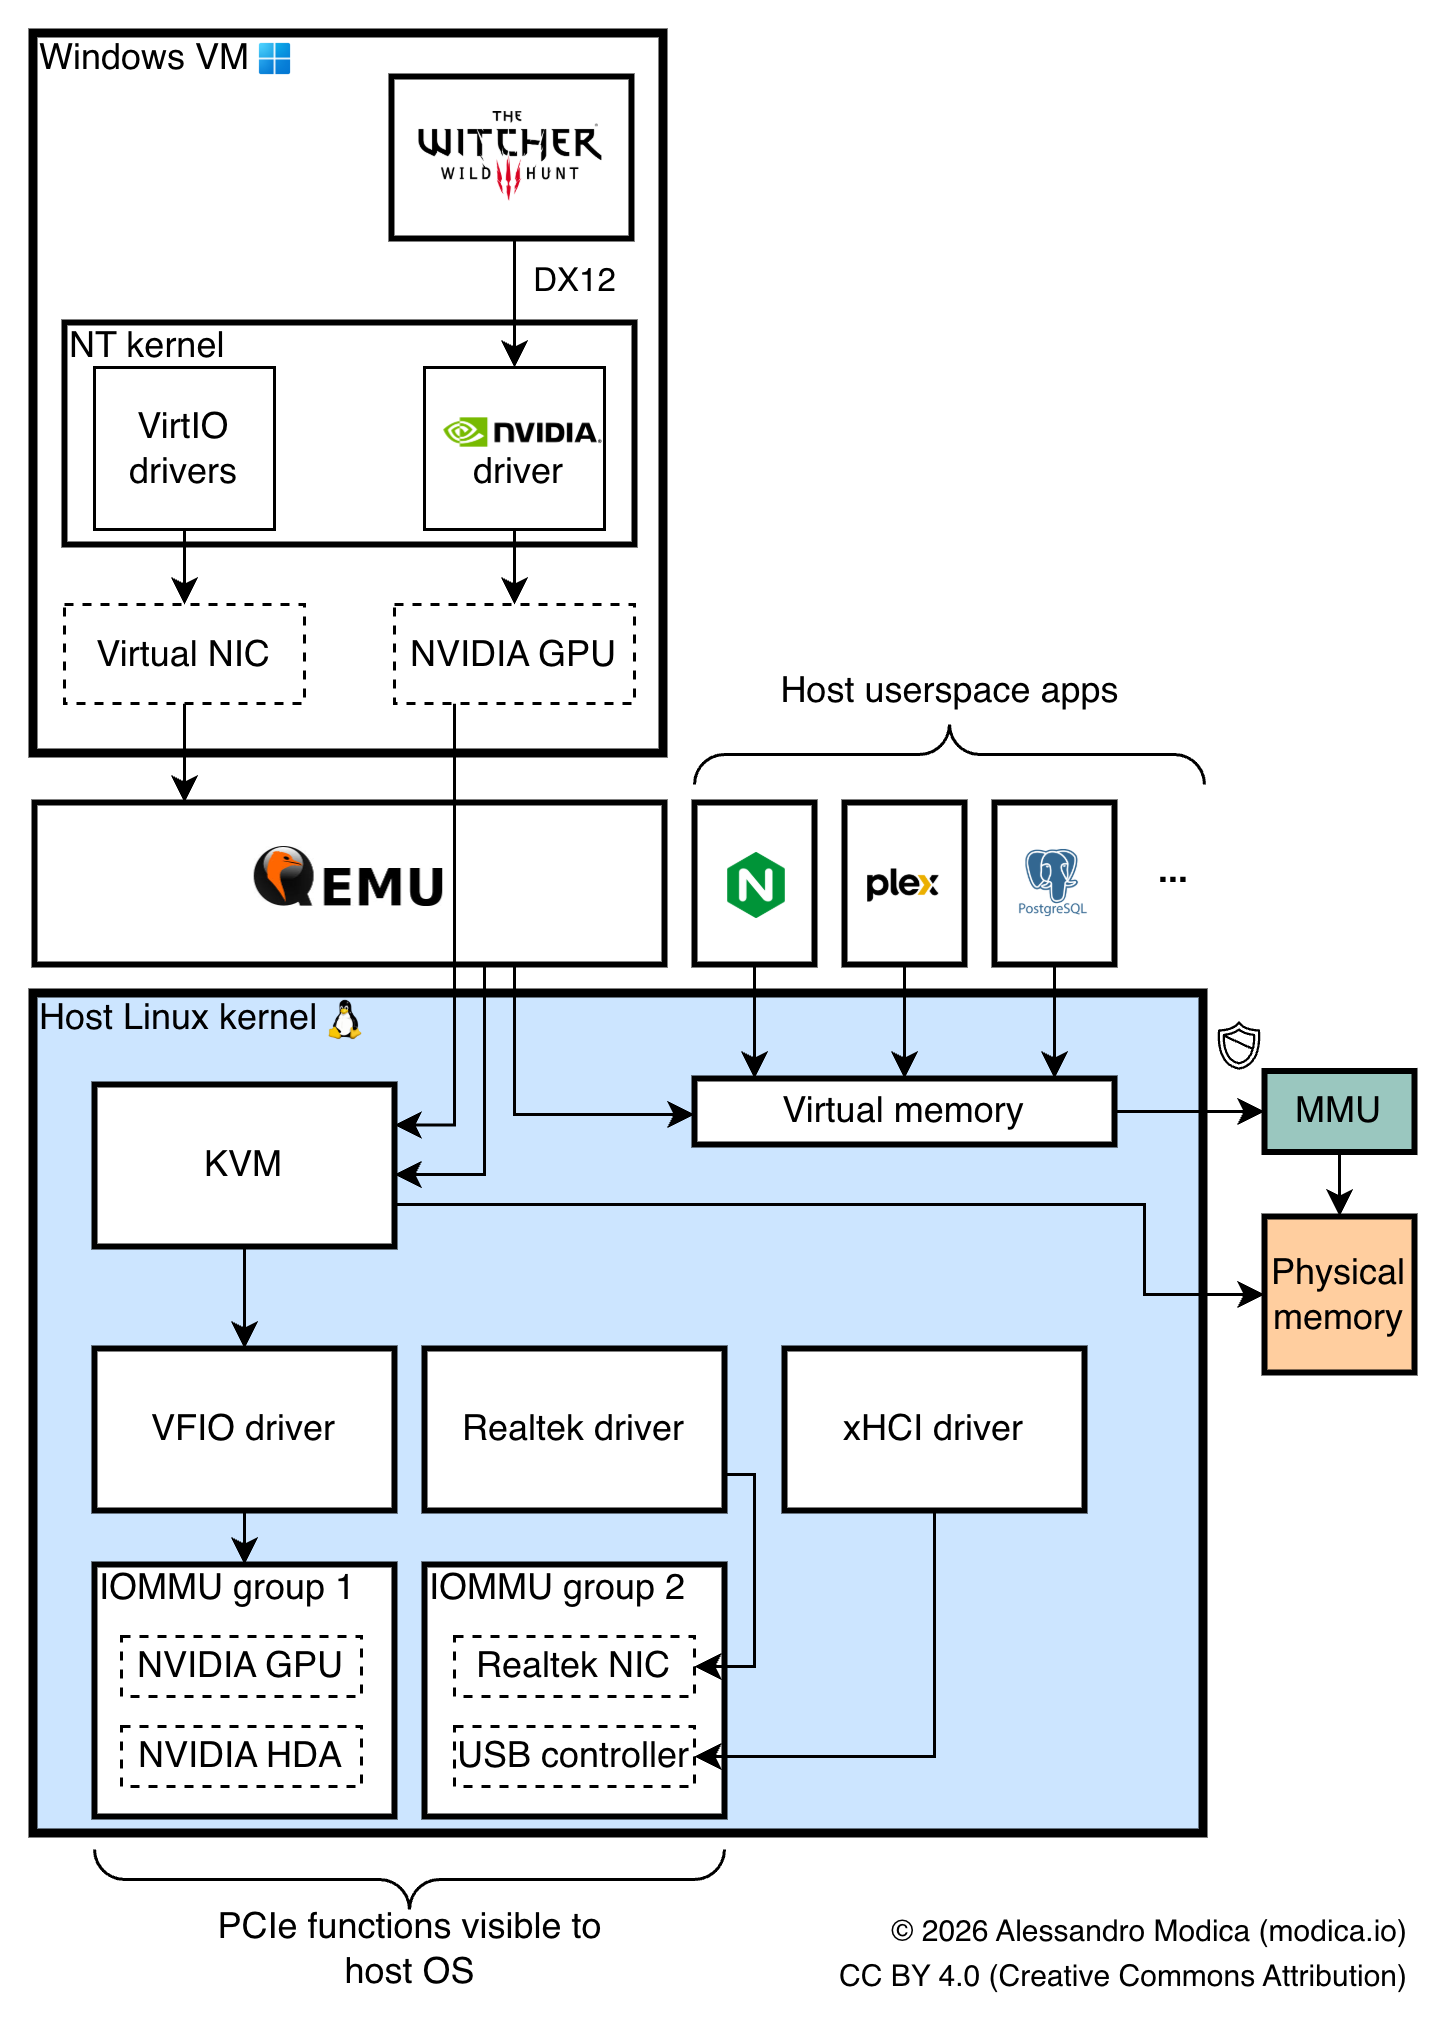
VFIO heavily leverages IOMMU, a PCIe feature which maps virtual address spaces for each PCIe device onto regions of your host's memory space, much like your OS and MMUs map different processes' virtual memory onto physical memory. This enables physical devices to be mapped to the memory spaces of entirely different guest OS's, provided that the IOMMU topology of your system is granular enough, as we'll see later.
The advantages of GPU passthrough in my case were significant: I didn't want two separate chassis taking up space in my small apartment office, and by adding just a GPU to my server I could get away with a single machine instead of two, as well as get on-demand remote access to my GPU and easily experiment with different VMs, operating systems, environments and untrusted software (like dual boot, but on steroids).
Granted, there are significant drawbacks too, which might urge some prospective adopters to reconsider. For starters—as might be evident from the sheer length of this article—to get this setup working reliably is no easy task, particularly if your choice of hardware is sub-optimal. Gaming and running pro applications in a VM requires significant fine-tuning of the hypervisor/host system, careful planning of PCIe lane allocation, and most importantly, mindful shopping. You also won't be able to play any online title with an anticheat that detects VMs; do not even try: it won't work!
You might be lucky and end up with a satisfyingly working setup with little effort and on your first try. You might struggle significantly and spend tens of hours trying to troubleshoot timing or performance issues to no avail, and give up. Chances are you'll experience something in between, but what this world tends to reward the most, is a lot of patience and good bookkeeping.
Choosing the Hardware
CPU and Memory
I wanted a reasonably priced CPU that could basically carry the weight of two computers off of the back of one, that had excellent gaming and low-latency application performance and with many cores to support multiple VMs and Docker-based apps without breaking a sweat.
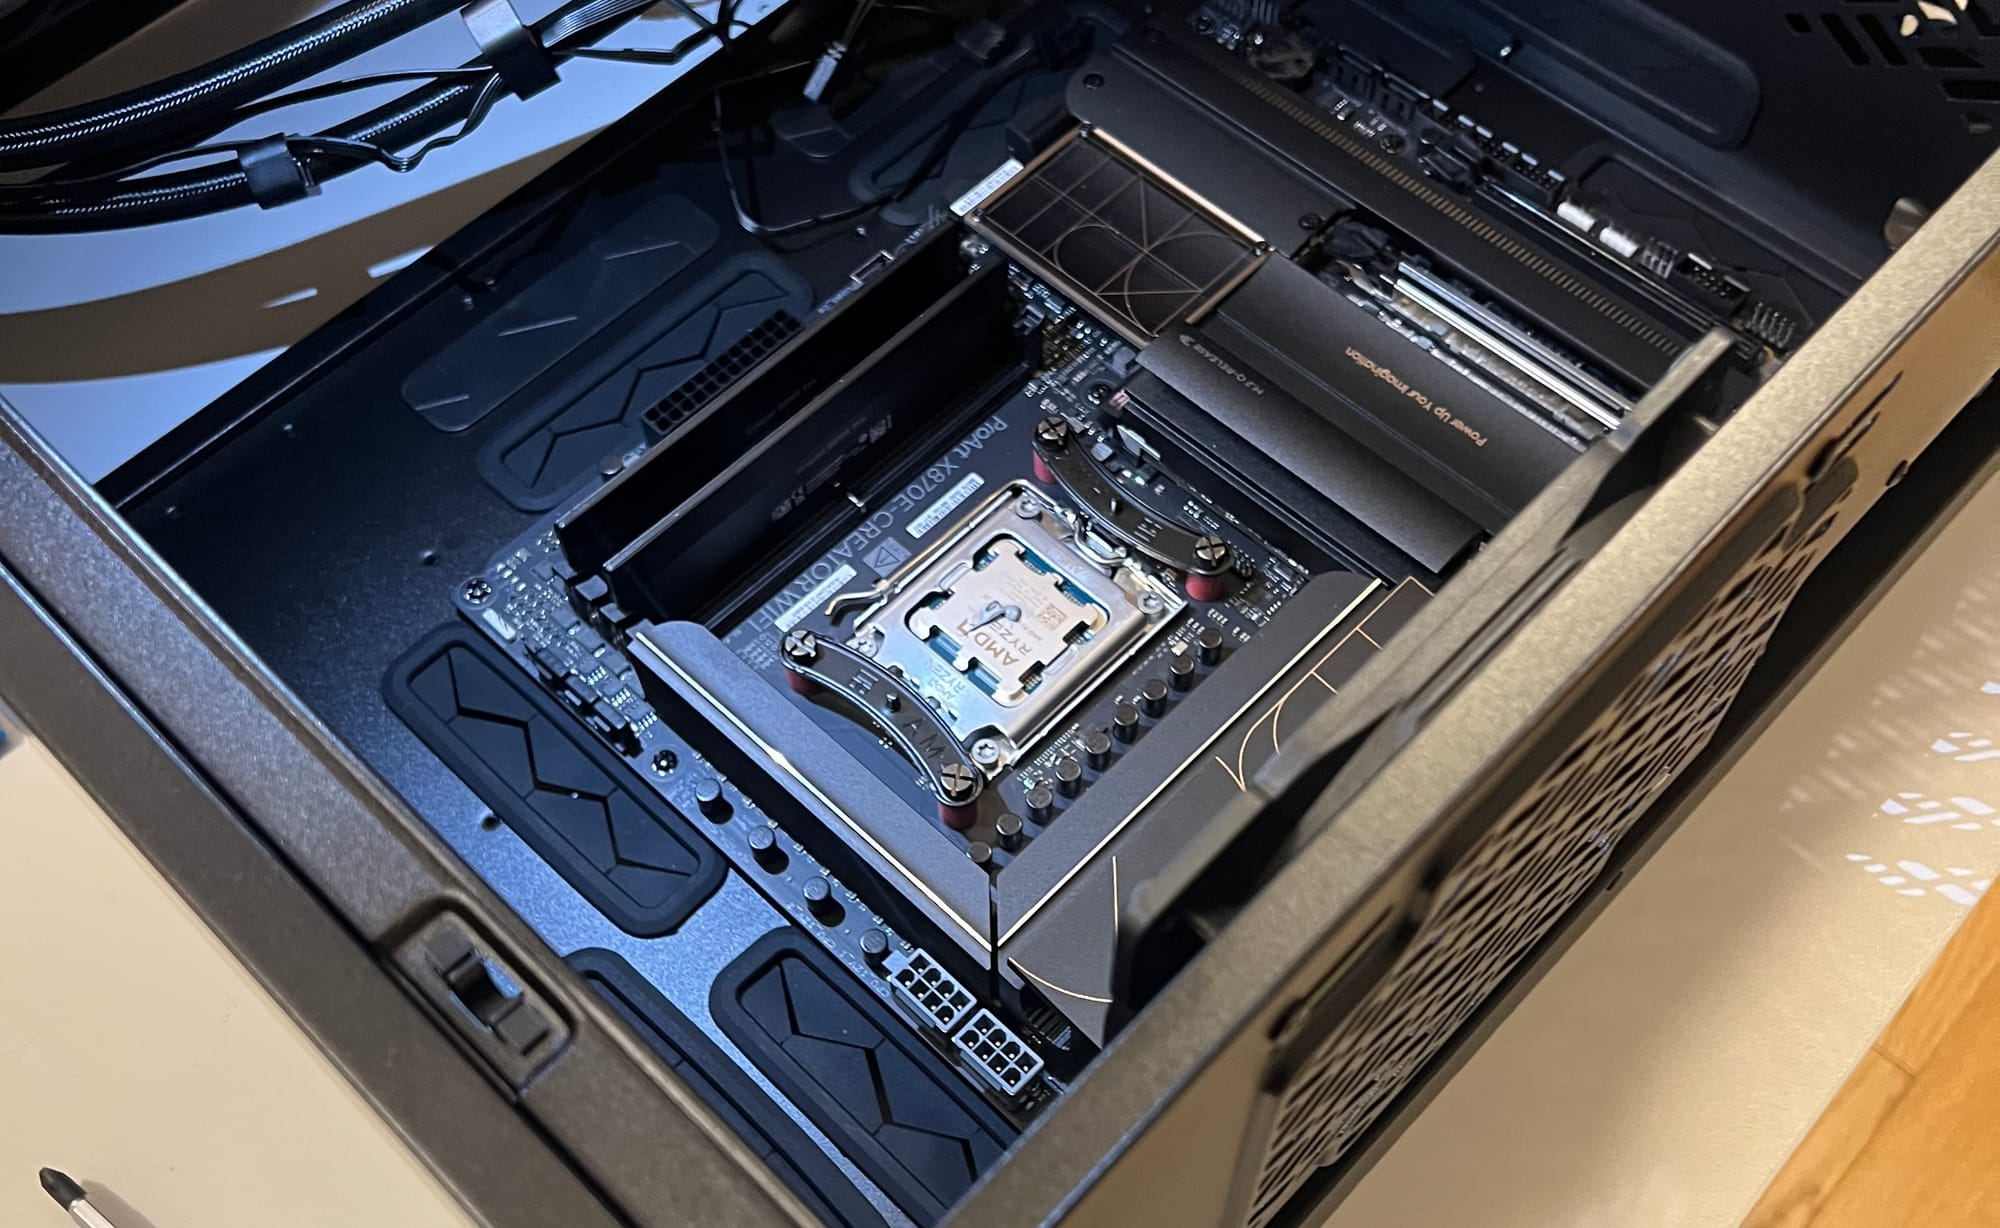
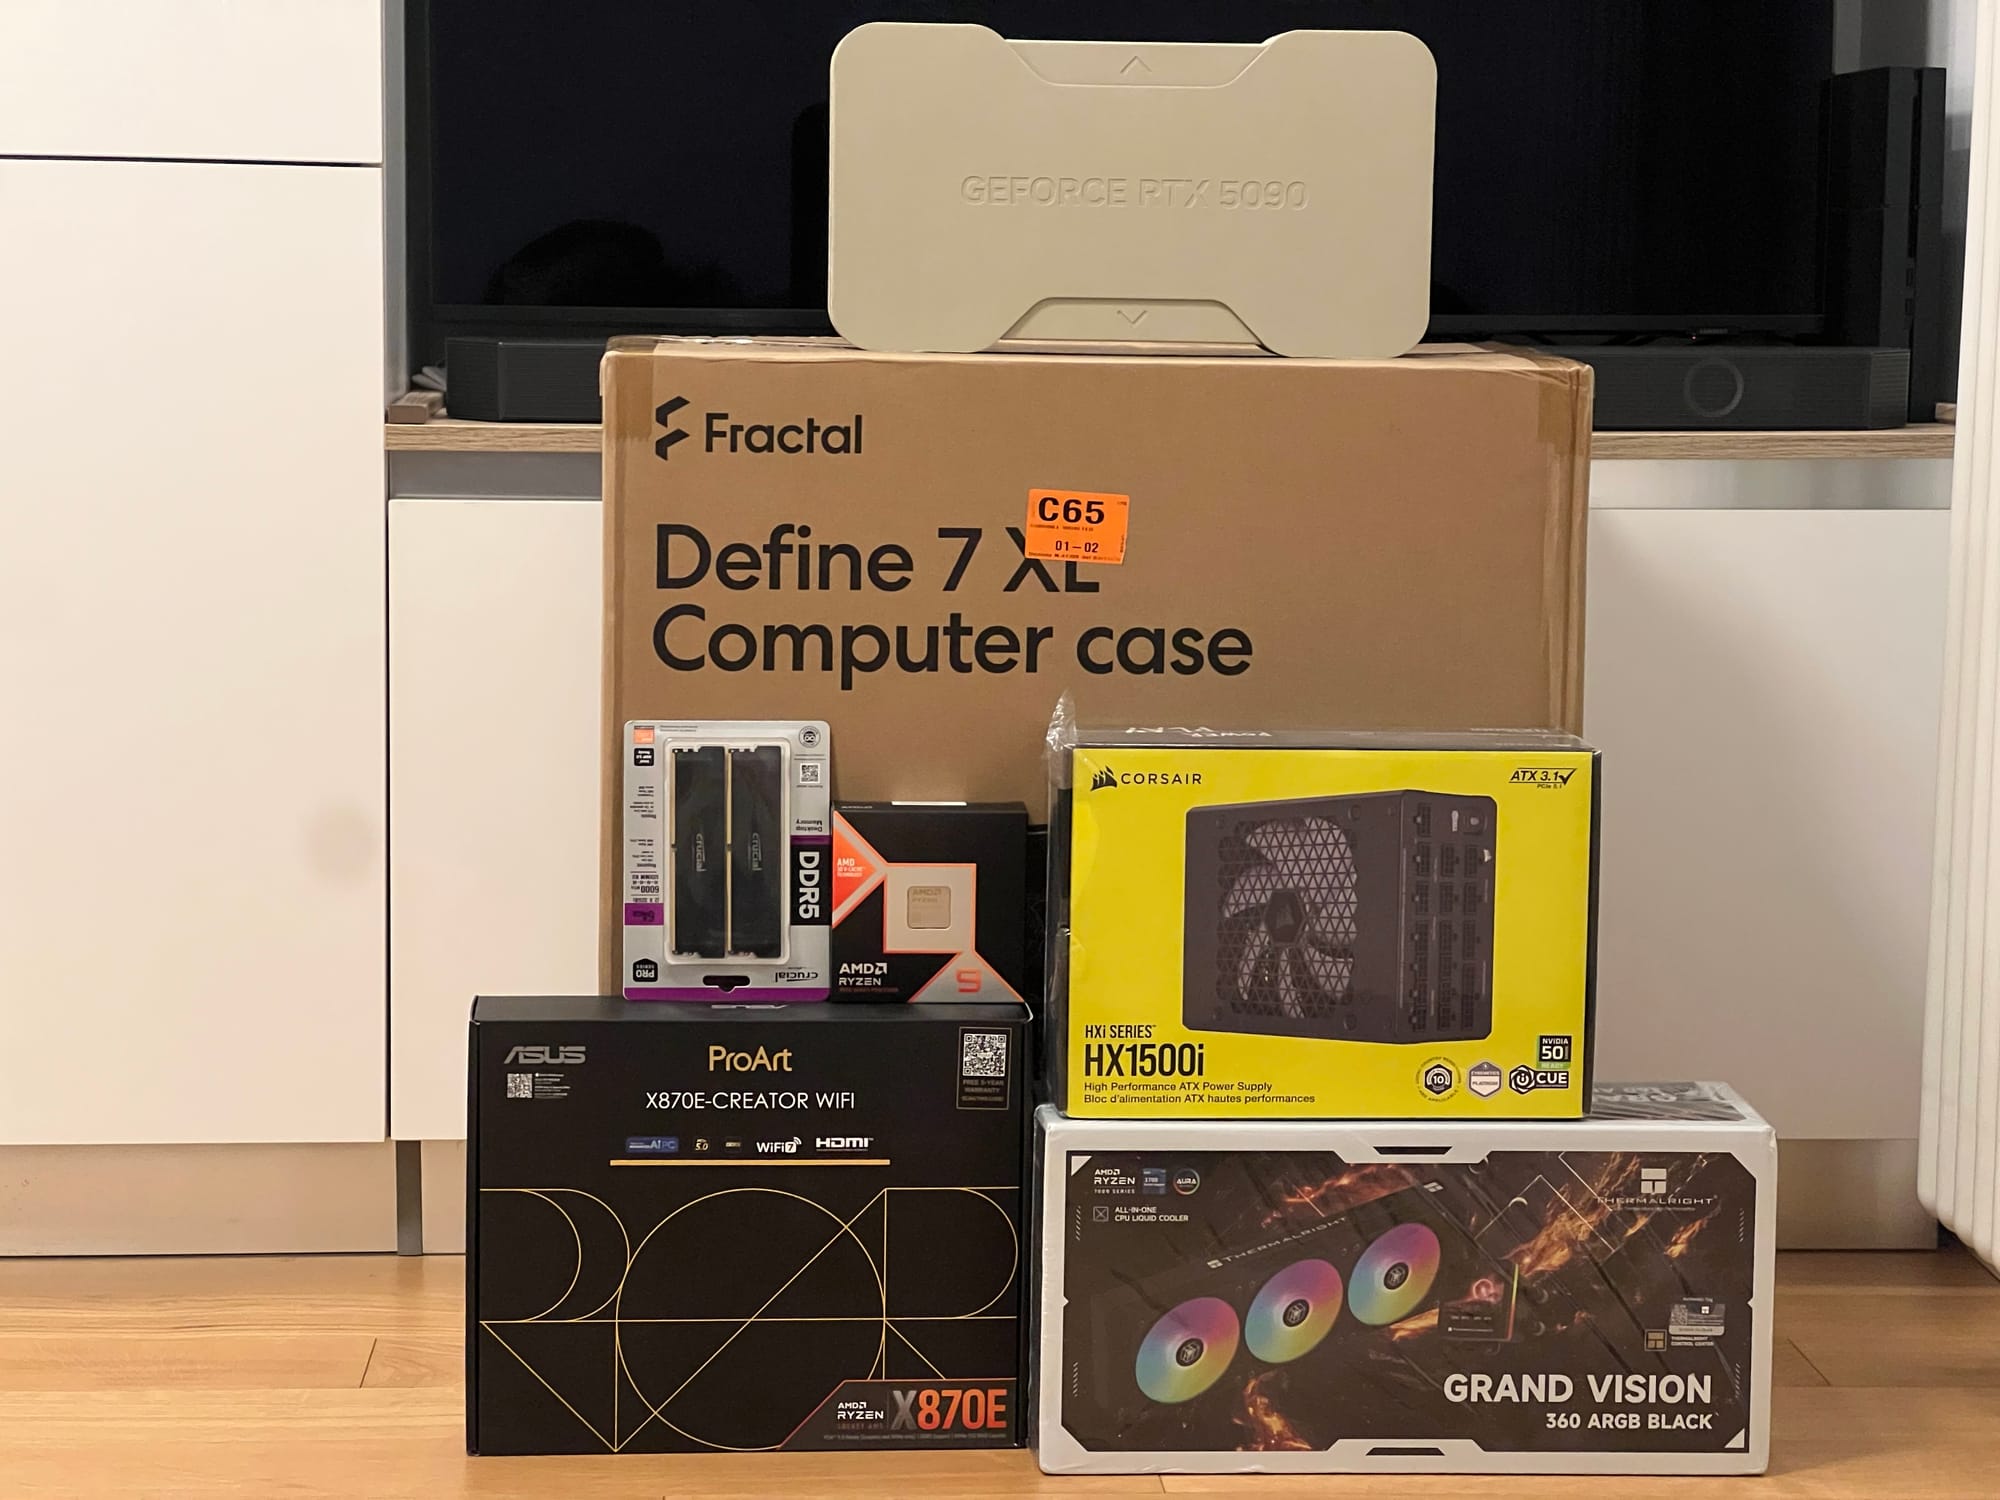
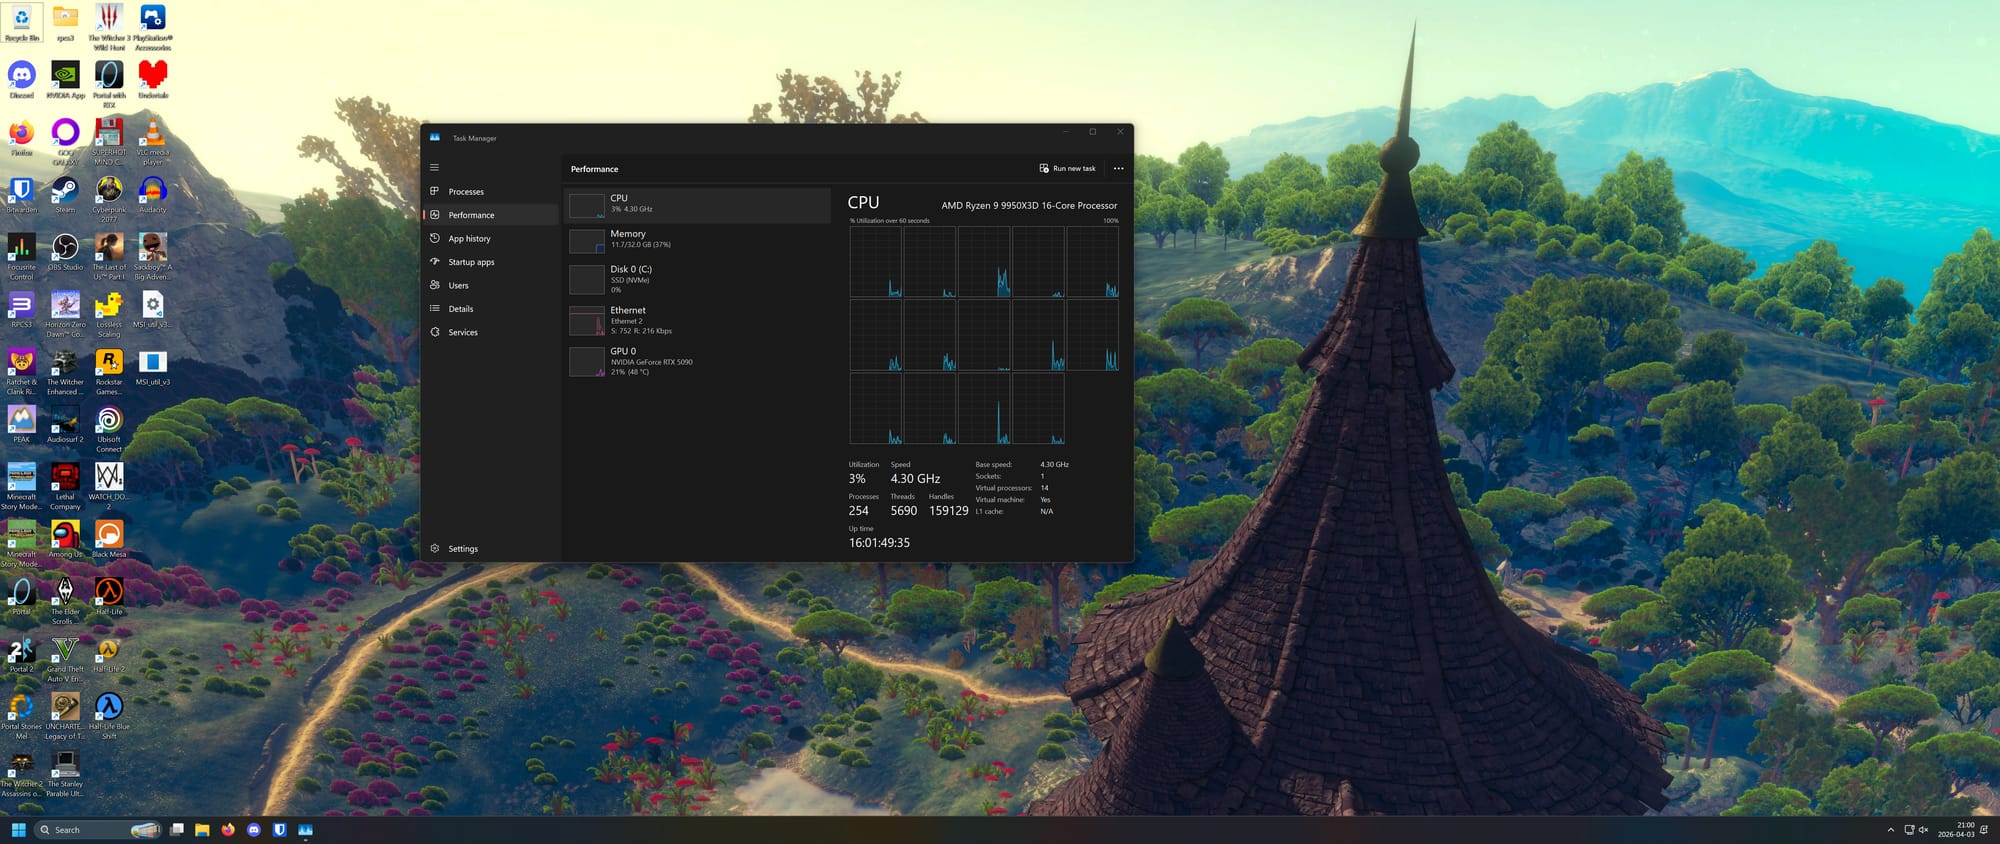
The choice was clear: the AMD Ryzen 9 9950x3d (16-core, 32 threads). With a whopping 64 MiB of 3D V-Cache (for a total of 144 MiB across L2 and L3 cache!), its dual-CCD topology means I can isolate and pin the 3D V-Cache chiplet (CCD0) to my gaming VM, and the other (CCD1) to other services and VMs. It's not NUMA, but it has heterogeneous CCDs and is overall the best non-Threadripper non-Epyc CPU money could buy at the time of writing. My sole complaint is the lack of a built-in hardware video codec accelerator, meaning I've had to disable Plex Transcoding to avoid incurring the penalty of software-based encoding; Intel's QuickSync engine unfortunately still has the upper hand here.
My choice of system memory was more dictated by circumstances than preference. I ended up with a (not officially supported) configuration with 4x32 GiB (128 GiB total) of Crucial Pro DDR5 (two 2x32 GiB kits, clocked at 6000 MHz CL40 each). Yep, CL40. I know. I bought my first kit for cheap prior to the to the shortage, and had to overpay for the 2nd after realizing that I was struggling with 64 GB given my use case. Painful CAS latency aside—and neither am I exactly pleased with the fact that to pass multiple runs of Memtest86 I actually have to run the memory at 5800 instead of 6000 MHz, and raise its voltage to 1.4 V—128 GiB of memory is an absolute godsend for my setup. It might seem silly especially if like me you've never had a system with triple-digit memory before, but VMs, Docker, and a generously sized ZFS ARC will eat through that memory in the blink of an eye.
Motherboard
The most crucial make-or-break component to consider when working with VFIO and similar technologies is the motherboard: not only do its I/O capabilities (and the interconnect topology which exposes peripherals to your CPU, as you'll see later) dictate what options available to you, but the quality of the firmware and on-board devices play an important role in determining how smooth of a time you'll have with an advanced setup such as this.
For the latter you mostly have to trust the brand and the reviews available on a given unit, but on account of the former you should check out the IOMMU DB on iommu.info, which is an invaluable community-contributed resource that gives you a clear picture of what to expect PCIe-wise once you get your hands on the hardware, as we'll see later.
My choice was the Asus ProArt X870E-CREATOR WIFI: it comes with built-in 10 Gb ethernet, a very nice and full-featured UEFI firmware, extensive IO capabilities (including USB 4.0) and an IOMMU configuration very amenable to my intended setup.
Graphics Card
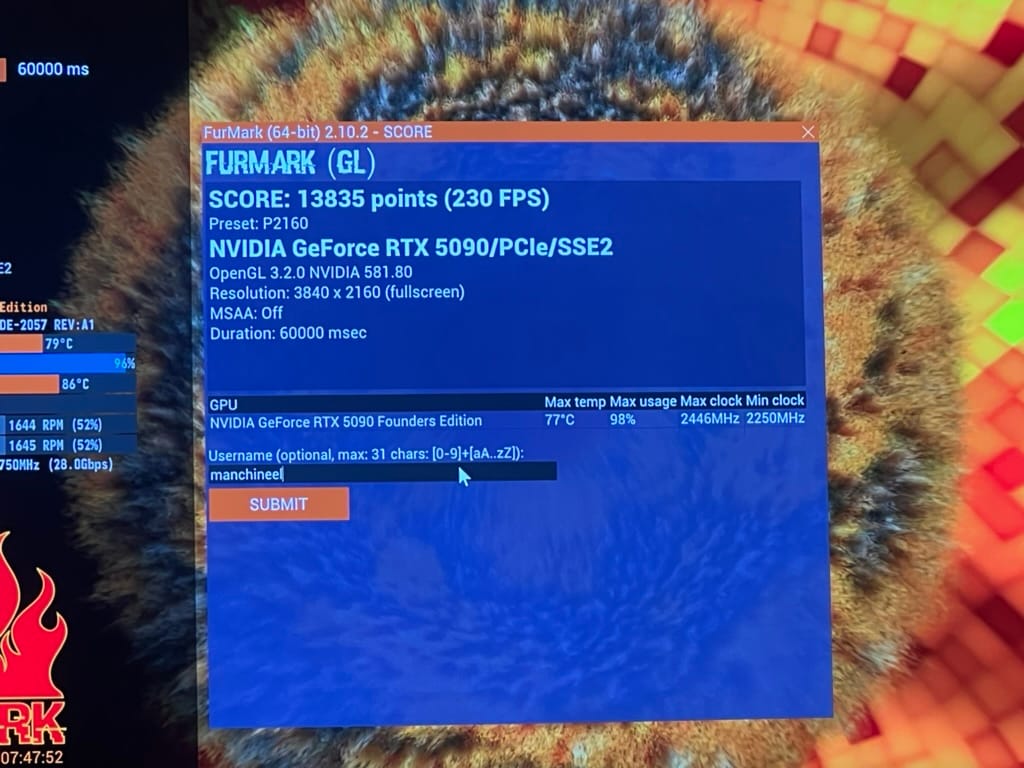
It's no secret that the absolute star of this upgrade would be the GPU: the only model that could fit the bill while remaining within the consumer segment is the NVIDIA GeForce RTX 5090. At a $1999 MSRP (€2099 in Europe for the Founders Edition model), it comes with 32 GB of super-fast GDDR7 memory. Although it doesn't pack the same punch as the RTX Pro Blackwell 6000 and its ludicrous 96 GiB of VRAM, it also costs less than 1/4 as much, and performance in most gaming and professional applications is not very dissimilar.

The Blackwell platform it's based on allegedly has had critical PCIe passthrough bugs when in conjunction with Linux guests, but I can confirm that (as of my 2026 testing with Ubuntu Linux) this doesn't seem to be a problem any longer.
Chassis & Cooling
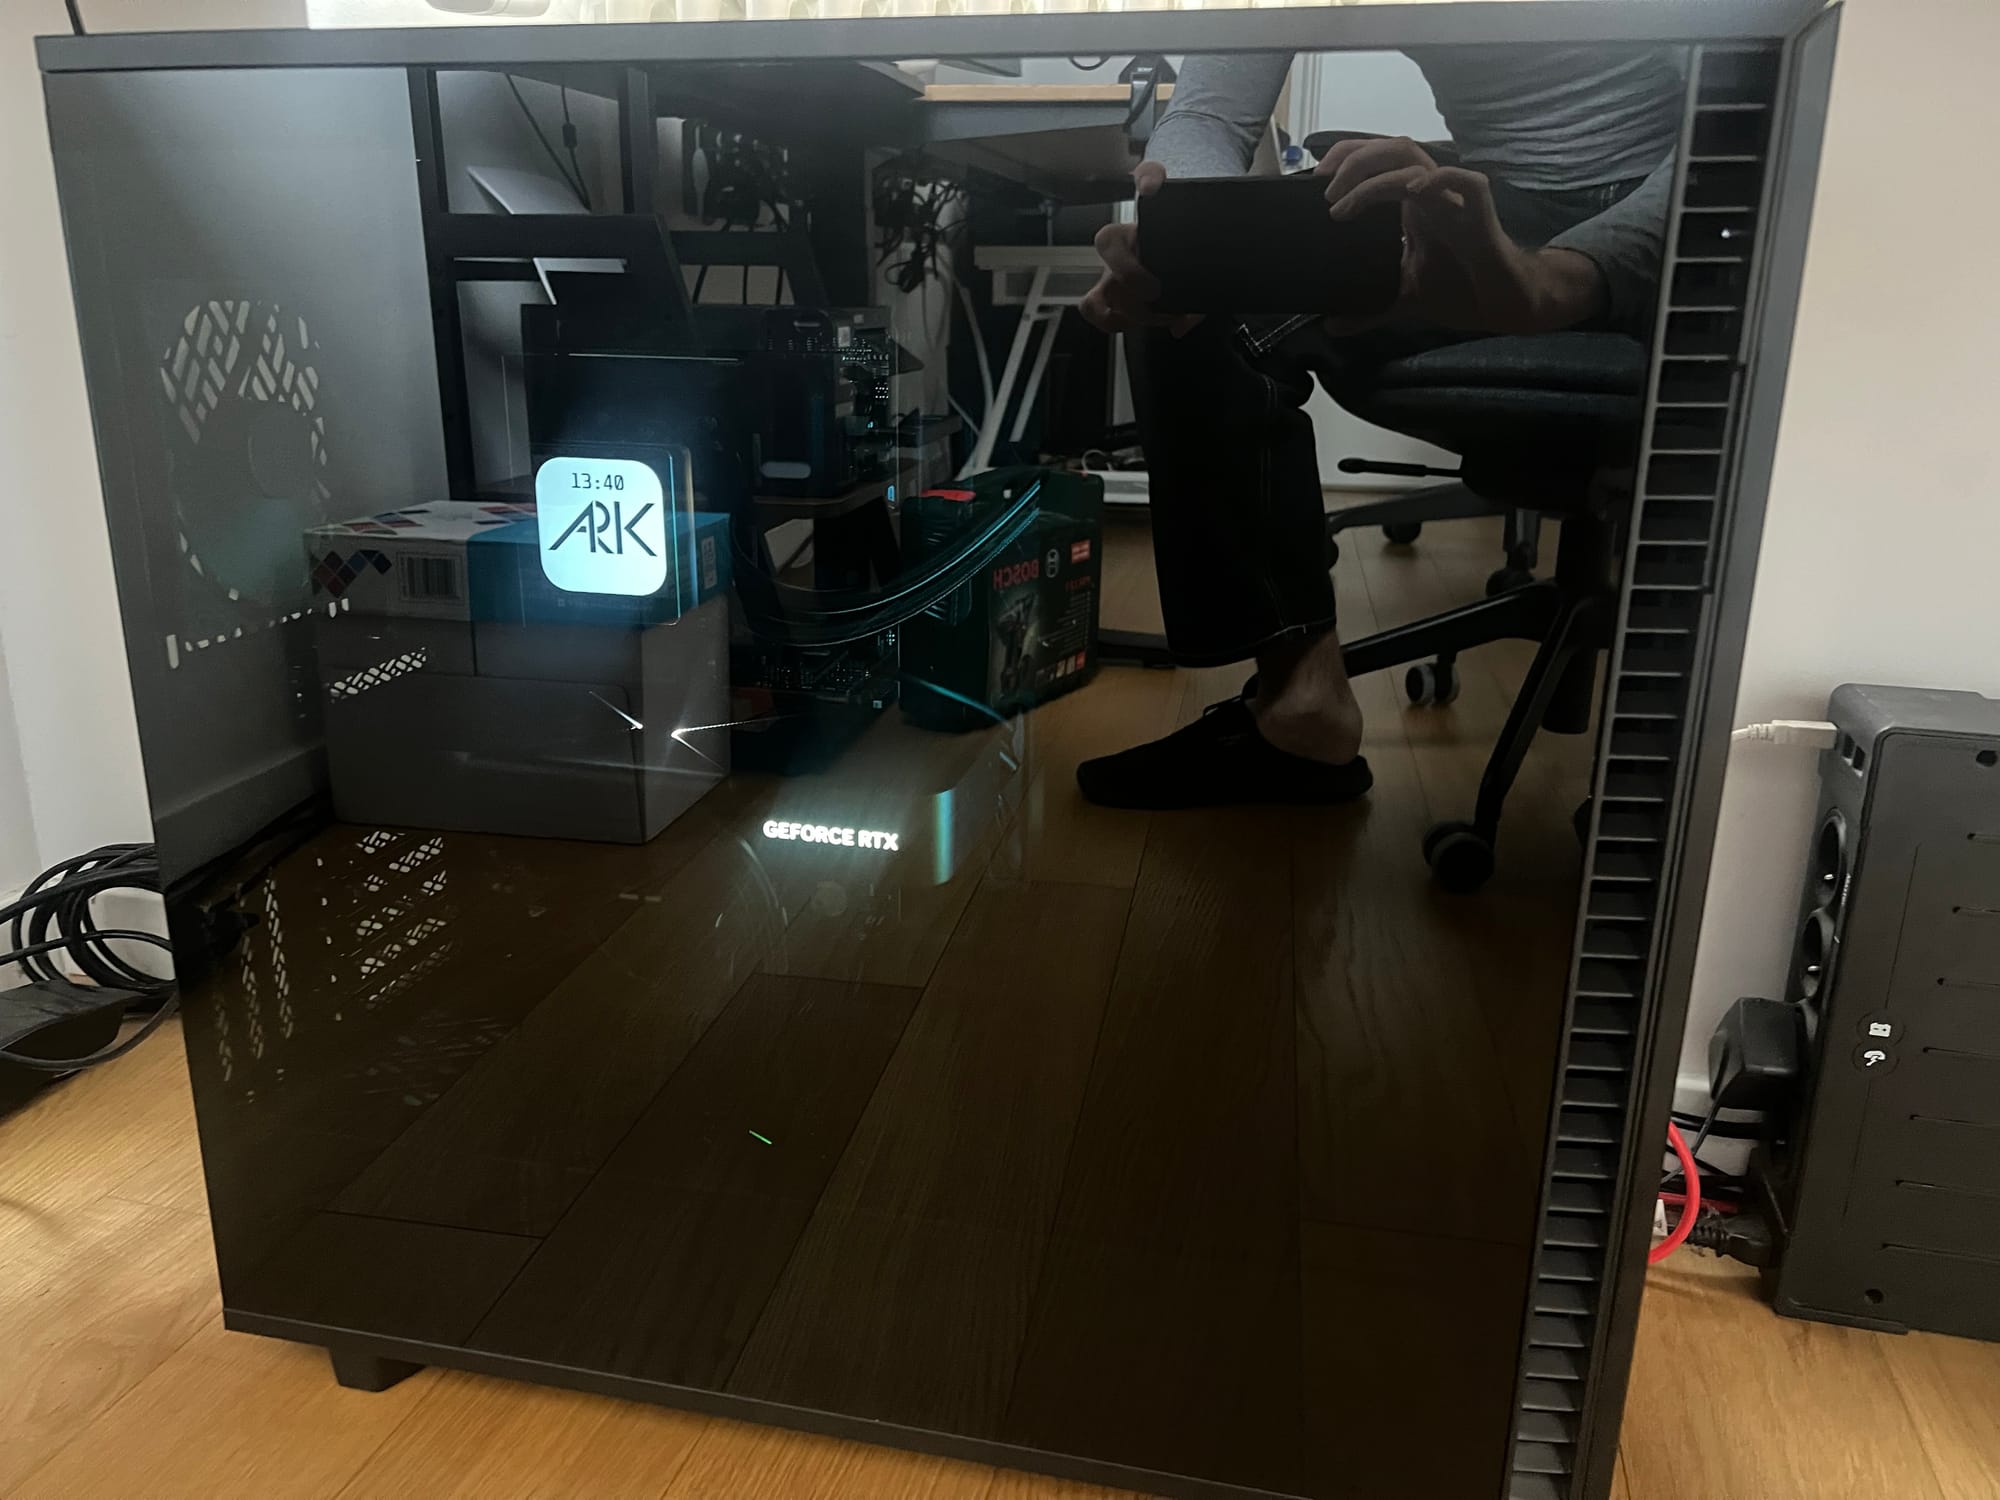
Of no less importance was my choice of case: the Fractal Design Define 7 XL is a real beast. With all the amenities of a modern high-end full-tower ATX/EATX case, it's one of the few models that can fit an RTX 5090 GPU, a 360 mm AIO radiator and up to 18 3.5" hard drives in its Storage Layout, all at the same time!
It's also a thing of beauty, available in any color you want (so long as it's black), with a tinted tempered glass side panel, impressive I/O options, and some really satisfying mechanics with a very premium feel: seriously, it's hard to overstate how much I love this case.
The CPU cooler is a Thermalright 360 Grand Vision AIO water cooler. As the name suggests it's a 360 mm unit, and it comes with a cute LCD display that goes over the CPU water block to display statistics (it has no Linux support out of the box, though the community is working on a port of the Windows "TRCC" control software and driver; right now it doesn't seem to work on my end so YMMV, but it might be the fault of my unique setup).
Power, Storage and Other Accessories
Other parts installed in my system are:
- 3x Lexar NM790 2TB PCIe 4.0 NVMe SSDs (2x used in a ZFS Mirror for application data and vdisks, 1x passed to the Windows VM via VFIO)
- 1x Samsung PM961 256 GB NVMe SSD scavenged from an old laptop (for some system data, hopefully will be the boot drive eventually)
- 4x Seagate Exos X24 24 TB SATA HDDs (in a ZFS RAID-Z1 configuration)
- Corsair HX1500i (2025) 1500W PSU
- Corsair Internal 4-Port USB 2.0 Hub
- StarTech.com two-port USB 3.1 PCIe Adapter (also passed to the VM via VFIO)
My stylish setup is finally completed by:
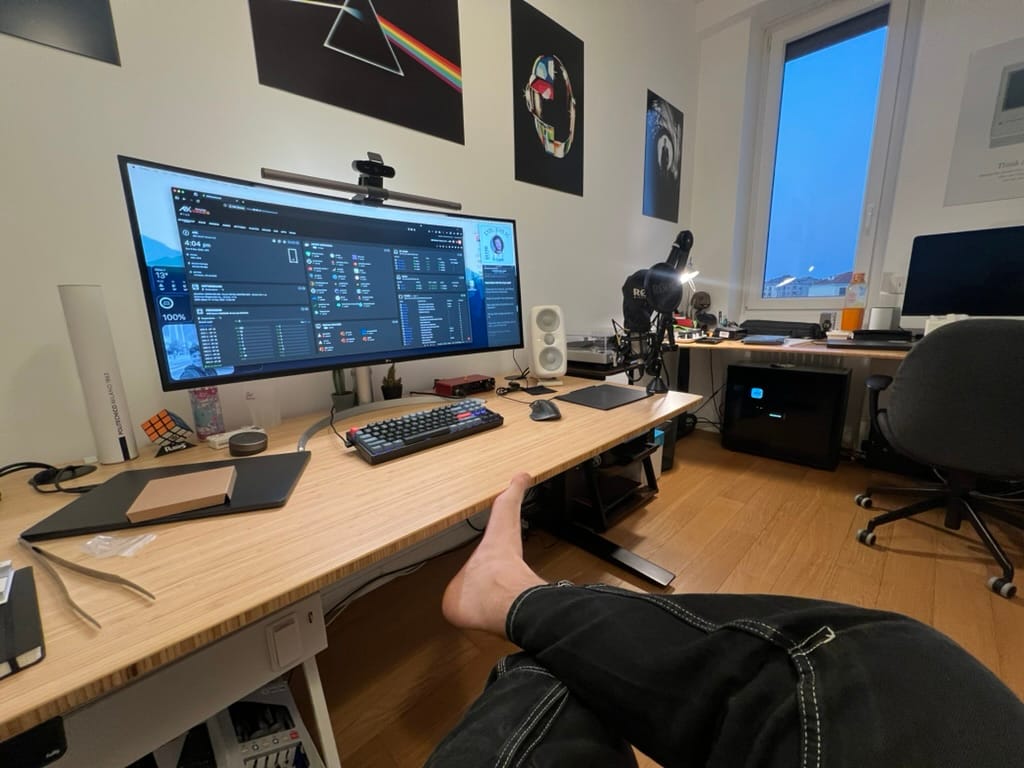
- LG 40WP95C 40" (5120x2160 WUHD, FreeSync, 72 Hz IPS, Thunderbolt 3) ultrawide monitor
- Keychron K8 Pro mechanical keyboard (with QMK firmware)
- Logitech MX Master 3 mouse
- UGREEN USB 3.0 KVM Switch (to switch USB peripherals between the VM/server and my docked MacBook)
- Logitech Brio 4K webcam
- Focusrite Scarlett 4i4 (3rd Gen) audio interface
- APC Back-UPS Pro for Gaming (2200VA/1320W)
- 2x IK Multimedia iLoud MTM studio monitors
- Røde NT1-A condenser microphone
- Mounted on Røde PSA-1 boom arm
- Wacom Intuos M graphics tablet
- BenQ ScreenBar Halo desktop light
- Fully Jarvis Bamboo adjustable standing desk
- Herman Miller Aeron office chair
If you're looking to replicate my results, you should be comfortable with reading manuals and wiki pages, using the Linux command line, editing config files, configuring boot loader options, and possibly recovering your system if something goes wrong. I take NO RESPONSIBILITY whatsoever if you lose your data, if you break your OS, or if you get banned from online games because you tried to play them in a VM. You've been warned!
Hardware and Firmware Configuration
The first thing I like to do on new PC hardware is upgrade the BIOS. This is especially important on modern AMD platforms where AGESA updates improve DDR5 stability and apply critical security patches. Asus's FlashBack feature comes in handy, allowing the user to update BIOS with a FAT32 USB drive at the push of a button.
There's nothing very peculiar to be set in terms of UEFI preferences: obvious things like EXPO (aka XMP) profiles and memory clock/voltage might need some fine-tuning with the help of Memtest86 when running so much memory, and you should check all the usual suspects are in order:
- Above 4G Decoding on
- Resizable Bar on
- Linux Mode (or Disabled) Secure Boot
- Fast Boot off
- PCIe bifurcation on
- CSM off
- IOMMU on
- Internal GPU as the startup graphics adapter
- Disable the guest's boot drive as a UEFI boot option (unless you're going for a crazy setup where you can either boot natively into your guest OS or run it virtualized—not recommended!)
The most crucial aspect is ensuring the PCIe hardware configuration makes sense with respect to the board's IOMMU topology. This basically entails booting into Linux (or using this handy community-provided resource) to check if the way your PCIe devices are split between different IOMMU groups will allow you to get the configuration you need.
For example, I'm using the top and middle PCIe x16 slots for my GPU and USB AIC respectively. According to the IOMMU topology (which can be discovered via the command:
for d in /sys/kernel/iommu_groups/*/devices/*; do
    n=${d#*/iommu_groups/*}; n=${n%%/*}
    printf 'IOMMU Group %s ' "$n"
    lspci -nns "${d##*/}"
done
Print all devices with their corresponding IOMMU group
It appears that groups 15-17 contain only the devices I want to use with VFIO:
...
IOMMU Group 15 01:00.0 VGA compatible controller [0300
]: NVIDIA Corporation GB202 [GeForce RTX 5090] [10de:2
b85] (rev a1)
IOMMU Group 15 01:00.1 Audio device [0403]: NVIDIA Cor
poration GB202 High Definition Audio Controller [10de:
22e8] (rev a1)
IOMMU Group 16 02:00.0 Non-Volatile memory controller
[0108]: Shenzhen Longsys Electronics Co., Ltd. Lexar N
M790 / Patriot Viper VP4300 Lite NVMe SSD (DRAM-less)
[1d97:1602] (rev 01)
IOMMU Group 17 03:00.0 USB controller [0c03]: ASMedia
Technology Inc. ASM2142/ASM3142 USB 3.1 Host Controlle
r [1b21:2142]
...
Note that no other devices are present in the respective IOMMU groups. This is very important to us, as it reveals that they are kept separate from one another by the chief security mechanism (ACS) at the hardware PCIe bus level, and we can thus bind these devices (the GB202 GPU, its corresponding HD Audio Adapter, an NVMe SSD and the dedicated USB 3.1 controller) to the Linux VFIO driver at boot.
Were this not the case, trying different ports (particularly for M.2 NVMe slots) can sometimes reveal a configuration where the intended devices appear under separate IOMMU groups, but there's only so much you can do within your hardware's limits if your motherboard is wired the "wrong way" (with all PCIe devices under one IOMMU group).
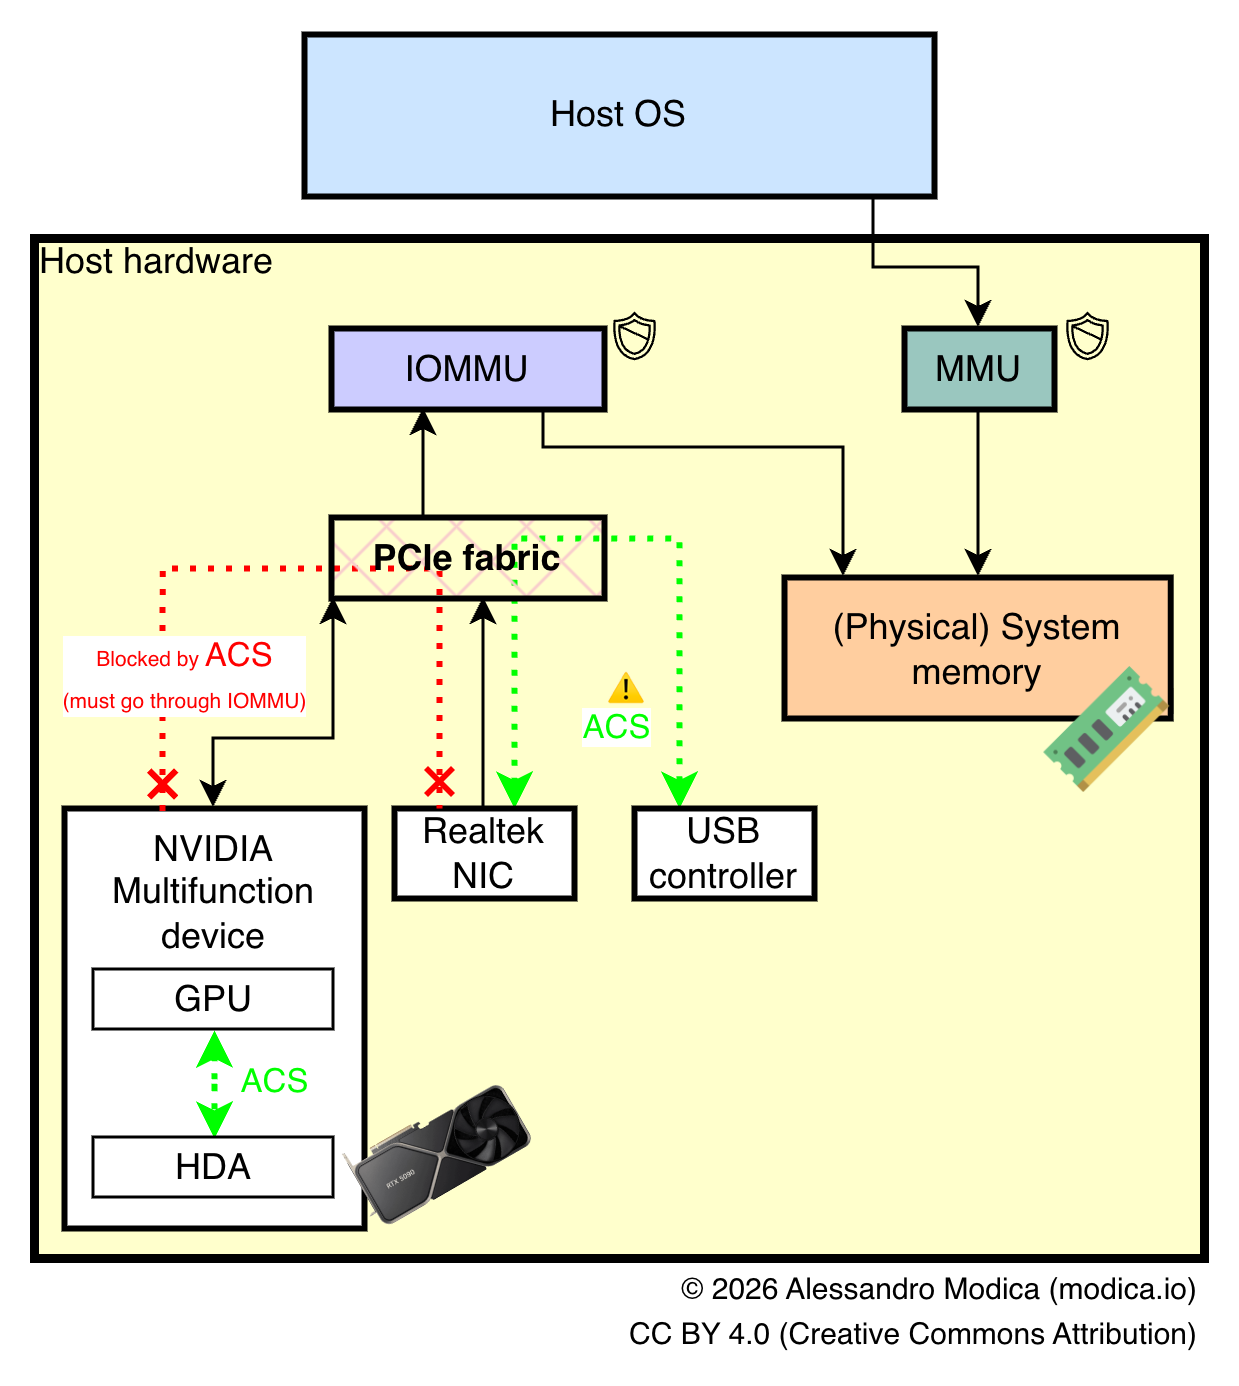
For example, during the writing of this article, a GPU variant of a well-known DRAM vulnerability called Rowhammer was discovered, affecting users of some 50-series NVIDIA RTX GPUs, and eventually being used to target host memory. One mitigation that has been mentioned is enabling IOMMU, but if the ACS bypass patch is enabled, the memory space of other devices that in turn can interact with the host could be compromised, resulting in potential unwanted access albeit through a very complex and not yet proven exploit chain.
Unraid comes with this patch built into the kernel, but disabled out of the box, and it can be toggled on with a kernel command line flag, with the aforementioned caveats in mind.
As always, checking your motherboard manual will be essential for getting the most out of your hardware. In my case, page 14 of the manual shows how bandwidth is allocated across PCIe ports and how to connect them to avoid bottlenecks.
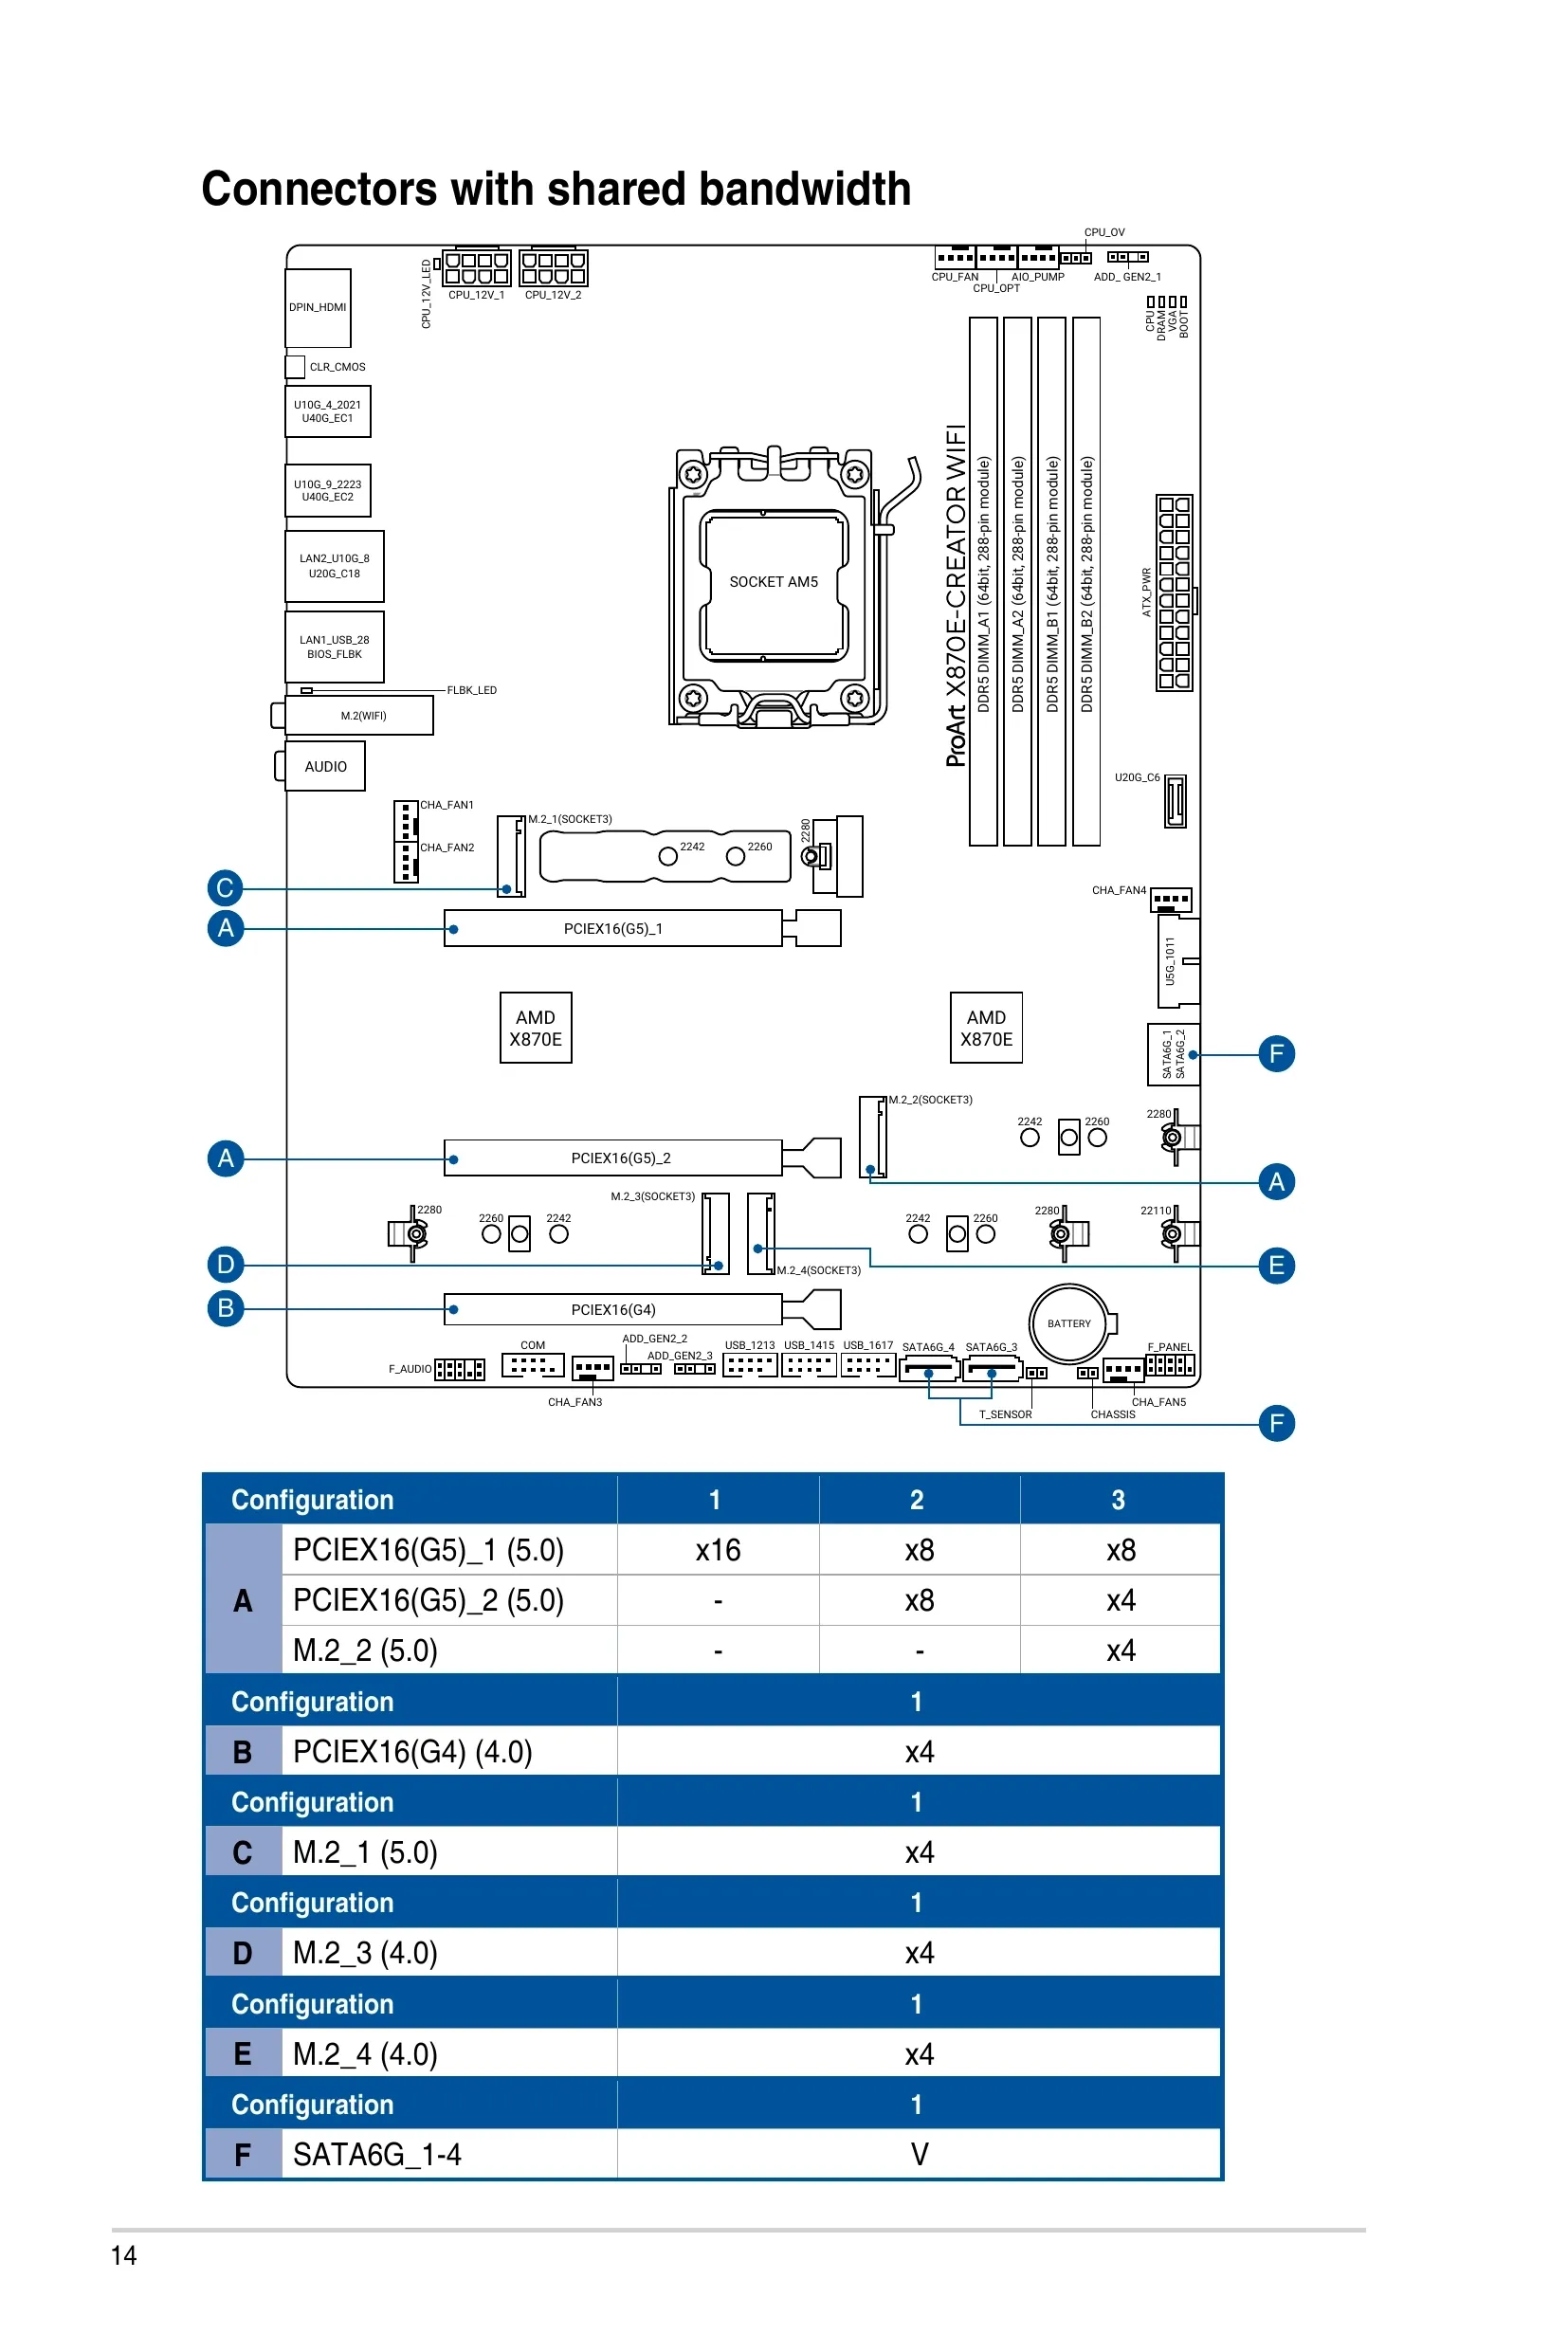
PCIEX16(G5)_1 and PCIEX16(G5)_2. This means my graphics card runs at x8 (which is sufficient), my USB 3 controller runs at x4 (also fine), and all M.2 NVMe SSDs run at their native PCIe 3.0 or 4.0 x4.Preparing the Hypervisor OS
Although my OS of choice is Unraid (at least for the time being), this guide doesn't assume any specific distro and in fact should work with any modern Linux system running libvirt and QEMU with KVM. You can also achieve the same results with Proxmox, although I'm not a fan of its user interface and prefer the libvirt XML declarative approach to configuring VMs, so I'm not covering it.
Configuring Virtualization
For starters, we want to ensure hardware virtualization technologies are enabled and available. To check:
# lscpu | grep Virtualization

Virtualization:                          AMD-V
or you might get the Intel equivalent VT-x. Then we can check if kvm is available:
# lsmod | grep kvm

kvm_amd               196608  37
kvm
libvirt and possibly the rest of the virtualization suite for your distro must now be installed. Unraid comes with all of this set up out of the box, along with a nice web UI for monitoring and configuring VMs, but on "traditional" distros I suggest following the respective guides for installing libvirt and using either virsh command-line utility, or the Virt-Manager GUI to create and manage your VMs.
The Virt-Manager GUI running on a laptop can even be connected to an instance of libvirtd running on a headless server. Or you can even run it in Docker!
You must ensure the vfio-pci is available (it should be on any modern kernel), and ensure it gets loaded before the GPU drivers, if they are installed on your host. Again, this should work OOTB in Unraid, but you can ensure the same on any distro either through modprobe or by including the driver in your initramfs. See this section of the Arch Wiki for more information.
Finally, check that IOMMU is working properly on your system by running:
# dmesg | grep -i IOMMUIf nothing comes out, you might need to set the intel_iommu=on kernel cmdline flag on the your bootloader.
Enabling VFIO
We now need to configure the vfio driver so it binds to our desired devices on boot. On Unraid this can be trivially achieved through the System Devices menu under Tools, by checking the corresponding boxes and rebooting the system. On other operating systems, you must find the correct device IDs using this command:
for g in $(find /sys/kernel/iommu_groups/* -maxdepth 0 -type d | sort -V); do
    echo "IOMMU Group ${g##*/}:"
    for d in $g/devices/*; do
        echo -e "\t$(lspci -nns ${d##*/})"
    done;
done;
For example on my system, I get:
...
IOMMU Group 15:
	01:00.0 VGA compatible controller [0300]: NVIDIA Corporation GB202 [GeForce RTX 5090] [10de:2b85] (rev a1)
	01:00.1 Audio device [0403]: NVIDIA Corporation GB202 High Definition Audio Controller [10de:22e8] (rev a1)
IOMMU Group 16:
	02:00.0 Non-Volatile memory controller [0108]: Shenzhen Longsys Electronics Co., Ltd. Lexar NM790 / Patriot Viper VP4300 Lite NVMe SSD (DRAM-less) [1d97:1602] (rev 01)
IOMMU Group 17:
	03:00.0 USB controller [0c03]: ASMedia Technology Inc. ASM2142/ASM3142 USB 3.1 Host Controller [1b21:2142]
...
This means I want to pass through the following device IDs:
10de:2b85(GeForce RTX 5090)10de:22e8(the graphic card's audio)1d97:1602(Lexar NM790)1b21:2142(the ASMedia USB 3.1 Host Controller)
This can be achieved by setting the ids kernel module parameter for vfio-pci to a comma-separated list of IDs, in my case by appending ,vfio-pci.ids=10de:2b85,10de:22e8,1d97:1602,1b21:2142 to the kernel command line, or using modprobe to do the same.
As always, refer to the great Arch Wiki for more information, there are specific gotchas (especially if you have multiple devices of the same module) and multiple ways to achieve this.
Once VFIO is set up, reboot, then run lspci -nnk -d on each device ID, so as to verify that it's being correctly picked up by VFIO:
# lspci -nnk -d 10de:2b85

01:00.0 VGA compatible controller [0300]: NVIDIA Corporation GB202 [GeForce RTX 5090] [10de:2b85] (rev a1)
	Subsystem: NVIDIA Corporation Device [10de:2057]
	Kernel driver in use: vfio-pci
	Kernel modules: nouveau
Setting up CPU Isolation
Oft-overlooked but crucial steps when creating latency-sensitive VMs for applications like gaming are CPU isolation, core pinning, and TLB optimizations.
Your host's Linux kernel tries its best to schedule and distribute the load of user and kernel processes, as well as the handling of system interrupts, across the physical cores (or SMT threads) of your CPU socket(s) and over the finite amount of time available, in a way that is as even as possible. The long-prevalent Linux scheduler model was in fact aptly called Completely Fair Scheduler (CFS).
Unfortunately, by default CFS doesn't exactly help us. The process we intend to run is a beefy VM, which should ideally make full use of several cores, with these cores doing minimal to no extra work, particularly not taking on any load from the kernel, user processes, hardware interrupt handling, or even other VMs/domains that have lower priority than us. Fortunately we don't need to write our own custom scheduler—though some have tried, and modern Linux has a whole subsystem called sched_ext dedicated to "BYO-Scheduler from userspace code" via eBPF—we can just ask Linux to leave certain CPU cores alone. Enter CPU isolation in Linux.
This is easier than it sounds. Although there are fancier and more modern mechanisms for achieving this (i.e. cpusets via cgroups), a few simple kernel CPU flags will suffice.
If you're on a heterogeneous, CCD system like mine (which is the case on modern high-end Ryzen systems), your CPU will have multiple dies and different CPUs. You can discover the topology of your CPU with the lstopo command:
# lstopo

Machine (123GB total)
  Package L#0
    NUMANode L#0 (P#0 123GB)
    Die L#0 + L3 L#0 (96MB)
      L2 L#0 (1024KB) + L1d L#0 (48KB) + L1i L#0 (32KB) + Core L#0
        PU L#0 (P#0)
        PU L#1 (P#16)
      L2 L#1 (1024KB) + L1d L#1 (48KB) + L1i L#1 (32KB) + Core L#1
        PU L#2 (P#1)
        PU L#3 (P#17)
      L2 L#2 (1024KB) + L1d L#2 (48KB) + L1i L#2 (32KB) + Core L#2
        PU L#4 (P#2)
        PU L#5 (P#18)
      L2 L#3 (1024KB) + L1d L#3 (48KB) + L1i L#3 (32KB) + Core L#3
        PU L#6 (P#3)
        PU L#7 (P#19)
      L2 L#4 (1024KB) + L1d L#4 (48KB) + L1i L#4 (32KB) + Core L#4
        PU L#8 (P#4)
        PU L#9 (P#20)
      L2 L#5 (1024KB) + L1d L#5 (48KB) + L1i L#5 (32KB) + Core L#5
        PU L#10 (P#5)
        PU L#11 (P#21)
      L2 L#6 (1024KB) + L1d L#6 (48KB) + L1i L#6 (32KB) + Core L#6
        PU L#12 (P#6)
        PU L#13 (P#22)
      L2 L#7 (1024KB) + L1d L#7 (48KB) + L1i L#7 (32KB) + Core L#7
        PU L#14 (P#7)
        PU L#15 (P#23)
    Die L#1 + L3 L#1 (32MB)
      L2 L#8 (1024KB) + L1d L#8 (48KB) + L1i L#8 (32KB) + Core L#8
        PU L#16 (P#8)
        PU L#17 (P#24)
      L2 L#9 (1024KB) + L1d L#9 (48KB) + L1i L#9 (32KB) + Core L#9
        PU L#18 (P#9)
        PU L#19 (P#25)
      L2 L#10 (1024KB) + L1d L#10 (48KB) + L1i L#10 (32KB) + Core L#10
        PU L#20 (P#10)
        PU L#21 (P#26)
      L2 L#11 (1024KB) + L1d L#11 (48KB) + L1i L#11 (32KB) + Core L#11
        PU L#22 (P#11)
        PU L#23 (P#27)
      L2 L#12 (1024KB) + L1d L#12 (48KB) + L1i L#12 (32KB) + Core L#12
        PU L#24 (P#12)
        PU L#25 (P#28)
      L2 L#13 (1024KB) + L1d L#13 (48KB) + L1i L#13 (32KB) + Core L#13
        PU L#26 (P#13)
        PU L#27 (P#29)
      L2 L#14 (1024KB) + L1d L#14 (48KB) + L1i L#14 (32KB) + Core L#14
        PU L#28 (P#14)
        PU L#29 (P#30)
      L2 L#15 (1024KB) + L1d L#15 (48KB) + L1i L#15 (32KB) + Core L#15
        PU L#30 (P#15)
        PU L#31 (P#31)
Let's dissect this. We have two Die entries, and in each of them eight Core#L<number> entries (this is a 16-core CPU). Each core corresponds to two logical CPUs (e.g. PU ... (P#0) and PU ... (P#16) for the first physical core).
As you can see, the first die (CCD0) has the most total cache, and it contains (logical) processing units 0-15 and 16-23. These are the CPUs we want to use for our VM. We can of course allocate fewer of these cores to our VM, or use the other CCD if we intend to prioritize higher throughput instead of lower latency.
To fully isolate our CPUs for our virtualization tasks, we must add the following kernel command line flags to our bootloader configuration, adjusted for your choice of CPU set:
isolcpus=0-7,16-23(this ensures CPUs 0-7 and 16-23 are isolated and won't get used by processes not affine to them)nohz_full=0-7,16-23(this also disables background kernel activity on these CPUs)irqaffinity=8-15,24-31(this sets the affinity for kernel interrupt requests (IRQs) to be affine to your remaining CPUs, in my case 8-15 and 24-31)
Some guides might mention also rcu_nocbs which disables RCU callback handling on the target CPUs. This is not necessary as it is already ensured by the nohz_full flag.
spl module which comes with OpenZFS, particularly the module/spl/spl-taskq.c file. I'm currently working on a patch for the OpenZFS project that addresses this (hopefully I will submit it for upstreaming within the end of this year), but for the time being I've observed that ZFS maintenance/housekeeping tasks seem to heavily rely on the first CPU (cpu0), using up to 75%+ of its time on my system.This would translate to significant latency spikes and crashes within the Windows VM, particularly in the audio drivers of my audio interface, so for the time being I'm currently pinning only 7 physical CPUs to the VM (1-7 and 17-23) for this precise reason—alas, leaving significant performance on the table—so I'd rather solve this problem for good in the kernel module.
I'd be lying if I said this didn't result in many sleepless nights of troubleshooting to track down. I intend to make a new post with my findings about this matter soon, so stay tuned! 👀
Once kernel options are set correctly, we can reboot and optionally confirm that next to no work is being done on the isolated CPUs (you can use htop for that purpose) when no VM or process is specifically pinned to them.
Making sense of TLB and Hugepages
Before creating our VM and assigning CPUs to it via pinning, we need to talk about Hugepages.
To support the back-and-forth translation between physical and virtual addresses (used by processes), your hardware employs a Memory Management Unit (MMU), controlled by the OS, which in turn uses a specific cache memory, called Translation Lookaside Buffer (TLB), which caches recent address "translations" that have been made for a given process, significantly speeding up the resolution of memory pages for processes on your system.
VMs are not very different from ordinary processes, in that they too have their own virtual address space mapped to physical memory, and the entire memory space of the guest OS is mapped onto pages that need to be resolved by the MMU of the host system, and these resolutions are cached on the TLB. But TLBs—being a cache—have a limited capacity for entries, after which they must flush out old cached results, resulting in misses. Misses on the TLB are very expensive, and if they happen frequently enough your performance will suffer. This is why applications that need to allocate lots of memory like databases, memory stores and VMs can heavily benefit from Hugepages.
Hugepages is a Linux facility that allocates pages bigger than 4 KiB. Simple as that. Modern architectures support pages as large as 1 GiB, and each of these pages uses a single TLB entry, just like any other kind of page. This means that a VM with 32 GiB of assigned memory can go from using north of eight million pages (bound to fill up your system's TLB fairly quickly), to using as few as 32 pages, never getting flushed out of your TLB and thus ensuring consistent latency and performance for the guest and for other processes on the system.
There are two main ways to use Hugepages on Linux:
- HugeTLB: the traditional mechanism; you allocate pages by explicitly specifying how many Hugepages you wish to have (and optionally their size) at boot, and Linux will set them aside for any application to use.
- Transparent HugePages (THP): a newer implicit and opportunistic system, it automatically consolidates allocated pages in 2 MiB chunks.
I'll be blunt here: I couldn't get THP to work with QEMU on my system. You can use a command like sudo grep huge /proc/*/numa_maps to find the number of currently used hugepages by process if you're curious about whether any are using them. If you're running low on memory, there is no sufficiently long contiguous chunk of memory available, or the kernel simply doesn't like you, there's little you can do other than to configure Hugepages manually. Even if it's working as of now, it's still not a bad idea to configure Hugepages to ensure consistent VM behavior.
It's as simple as adding the following two kernel command line flags:
hugepagesz=1024M(the size of each page, I'm going with 1024 MiB which is the maximum but you can also choose2Mfor 2 MiB pages, or whatever other value is supported by your architecture)hugepages=38(the number of pages to be allocated; the size of your total available hugepages pool is =hugepagesz×hugepages= 38 GiB in my case)
Finally you must reboot, and to check that everything is in order you can use the /proc/meminfo report:
# cat /proc/meminfo | grep -i huge

AnonHugePages:  35526656 kB
ShmemHugePages:        0 kB
FileHugePages:         0 kB
HugePages_Total:       0
HugePages_Free:        0
HugePages_Rsvd:        0
HugePages_Surp:        0
Hugepagesize:       2048 kB
Hugetlb:        39845888 kB
This is from my production system, where all reserved HugeTLB pages are already in use
Creating the Virtual Machine
This is the part we've been gearing towards!
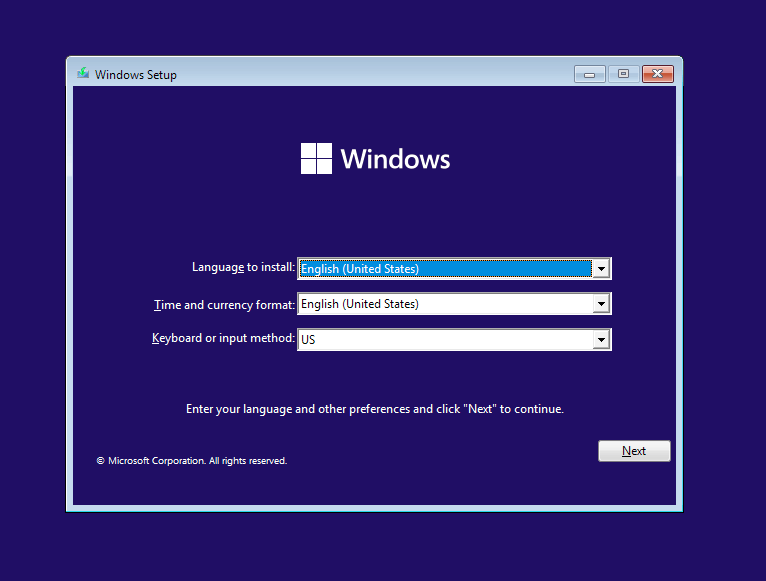
To install Windows, you'll need a copy of the Windows 11 install ISO for your platform from Microsoft (or—in case you wish to install a different operating system—find the corresponding ISO and download it). Fun fact: did you know that once you get your hands on a valid Windows download URL from the page above via desktop browser, you can use the same link to perform the transfer using wget or curl directly on your machine via SSH? Neat!
Again, I used the Unraid user interface to create my virtual machine since I'm using Unraid, but you can use any abstraction layer you want over the libvirtd API, such as the very well-respected Virt-Manager. Whatever route you pick, we'll still have to get our hands dirty with XML to tune a few things that these UI's typically do not expose. Make sure XML editing is enabled if you're using Virt-Manager.
Specifying VM parameters
I will not baby you through each and every step of the install, but in general you want to ensure the following basic options are set:
- Select Windows 11 (x64) as the OS to be installed, if applicable
- Use the Q35 chipset and OVMF (UEFI) firmware for best compatibility
- Ensure you have an emulated TPM 2.0 module on your VM if using Windows 11. I don't recommend using passthrough with your host TPM
- Disable the migratable option since we don't need it and it can hinder performance (this can be done by XML editing as well)
- Enable CPU pinning, and specifically select the same CPUs we've isolated before, matching the host topology and selecting the same cores and dies. On Unraid, it looks like this:
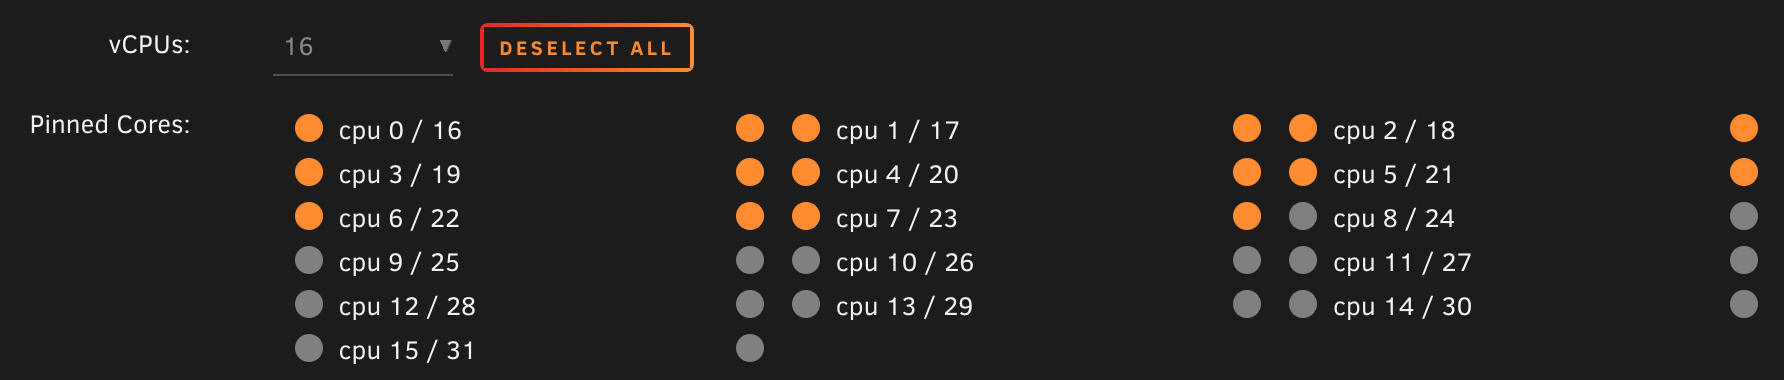
- Opt to Copy the CPU model and information from your host. On Unraid this is called
Host Passthroughmode - Set both initial and maximum memory to the value chosen before, consistent with your Hugepages configuration. Later, we'll edit the XML to allocate memory pages from HugeTLB
- Add the Windows install ISO as a SATA or DVD drive (and make sure it's set as the #1 boot option)
- Also add the VirtIO drivers ISO if installing Windows; this is required for your install to continue correctly. If youi don't have them, they can be downloaded from the virtio-win repository
- Add a NIC, having care to select the
virtiomodel for best network performance - Pass through your graphics card and all other relevant Host PCI Devices you intend to use with the VM
- Have some kind of storage device to install Windows; if you're not passing through an NVMe drive through VFIO (recommended) you should create a vdisk in
raworqcow2(slower) format and pass it to the VM as a VirtIO block device - Have some kind of USB controller to control the machine; you can either pass your mouse, keyboard and other peripherals directly, or (recommended!) pass through a whole USB controller after properly configuring VFIO for it.
DO NOT start the VM just yet, for we need to apply some manual changes to the XML configuration first.
<XML Tweaking/>
In particular, we want to ensure:
memoryandcurrentMemorymatch what you expect; we can now add amemoryBackingsection to enable use of hugepages:
  <memory unit='KiB'>33554432</memory>
  <currentMemory unit='KiB'>33554432</currentMemory>
  <memoryBacking>
    <hugepages>
      <page size='1048576' unit='KiB'/>
    </hugepages>
    <nosharepages/>
    <source type='memfd'/>
    <access mode='shared'/>
  </memoryBacking>
the size attribute of page must match the chosen hugepagesz in KiB
- vCPU placement and the
cputuneblock match previous considerations; if you have virtual devices like vdisks orvirtiofsshared filesystems, you can also add an IO thread and pin it to your non-VM cores, as well as do the same with theemulatorthread to move IO and QEMU tasks away from your isolated CPU cores. Note that my VM only uses cores 1-7, 16-23 for the VM (and the cores on the 2nd CCD foremulatorandiothread) due to the aforementioned ZFS bug, but in principle your config should be similar:
  <vcpu placement='static'>14</vcpu>
  <iothreads>1</iothreads>
  <cputune>
    <vcpupin vcpu='0' cpuset='1'/>
    <vcpupin vcpu='1' cpuset='17'/>
    <vcpupin vcpu='2' cpuset='2'/>
    <vcpupin vcpu='3' cpuset='18'/>
    <vcpupin vcpu='4' cpuset='3'/>
    <vcpupin vcpu='5' cpuset='19'/>
    <vcpupin vcpu='6' cpuset='4'/>
    <vcpupin vcpu='7' cpuset='20'/>
    <vcpupin vcpu='8' cpuset='5'/>
    <vcpupin vcpu='9' cpuset='21'/>
    <vcpupin vcpu='10' cpuset='6'/>
    <vcpupin vcpu='11' cpuset='22'/>
    <vcpupin vcpu='12' cpuset='7'/>
    <vcpupin vcpu='13' cpuset='23'/>
    <emulatorpin cpuset='8-15,24-31'/>
    <iothreadpin iothread='1' cpuset='8-15,24-31'/>
  </cputune>
I have defined one iothread which can be used elsewhere in the config for any virtual device that supports it. If experiencing poor performance with vdisks, you can experiment with iothreads or switch to VFIO for much closer-to-native storage performance.
- CPU is, in fact, in
host-passthroughmode with:migratableset tooff
- the correct topology attribute defined
- IF you are on a modern AMD system define the 'require'
topoextfeature policy to improve guest discovery of CPU topology features. Do NOT enable it on Intel as it's not suppported:
  <cpu mode='host-passthrough' check='none' migratable='off'>
    <topology sockets='1' dies='1' clusters='1' cores='7' threads='2'/>
    <cache mode='passthrough'/>
    <feature policy='require' name='topoext'/>
</cpu>- You are using the emulated
hypervclocktimer (on Windows) and not HPET:
  <clock offset='utc'>
    <timer name='hpet' present='no'/>
    <timer name='hypervclock' present='yes'/>
    <timer name='pit' tickpolicy='delay'/>
    <timer name='rtc' tickpolicy='catchup'/>
  </clock>
- Inside
features, you havehypervemulation configured correctly for best Windows performance:
    <hyperv mode='custom'>
      <relaxed state='on'/>
      <vapic state='on'/>
      <spinlocks state='on' retries='8191'/>
      <vpindex state='on'/>
      <synic state='on'/>
      <stimer state='on'/>
      <vendor_id state='on' value='none'/>
    </hyperv>
If anyone who knows more than me about virtualization is willing to share their feedback or criticism on any part of the advice present in this post, I'd love to hear about it in the comments, and I'll happily update my guide if it's shown to lead to improvements to performance or stability! :)
Starting the VM
Finally, we're at the moment of truth. Connect a physical display to the video output of your GPU (remember: it's like its own computer now!), as well as a mouse and keyboard to your VM's USB controller. Then, start your VM. You should be greeted with the OVMF/TianoCore EDK logo, and might have to press the return key to get Windows Setup to load from the emulated ISO device.

If your host is running NixOS, Collin Dewey even documented a way to use the Nix build system to easily swap out the logo with any BMP file on system rebuild. Pretty cool!
Unraid comes with a very posh "Unraid" logotype which I haven't found the need to replace, but I'm just throwing this info out there if anyone cares about what their system startup looks like.
Installing Windows
If you've had the pleasure of installing Windows before, you'll pretty much know the drill: set your language, region, keyboard layout, Windows edition—for the love of God almighty, please choose Windows 11 Pro and not the Home edition!
One thing of note is that you might have to install storage drivers in order to find your install destination disk. Just click on the "Load driver" menu, then navigate to the virtio-win disc, then onto your architecture (e.g. amd64), then onto your OS of choice (win11). Your drive should pop up fairly easily.
Once the install is complete, you'll be greeted with the absolute monstrosity that is the modern Windows 11 out-of-box experience:
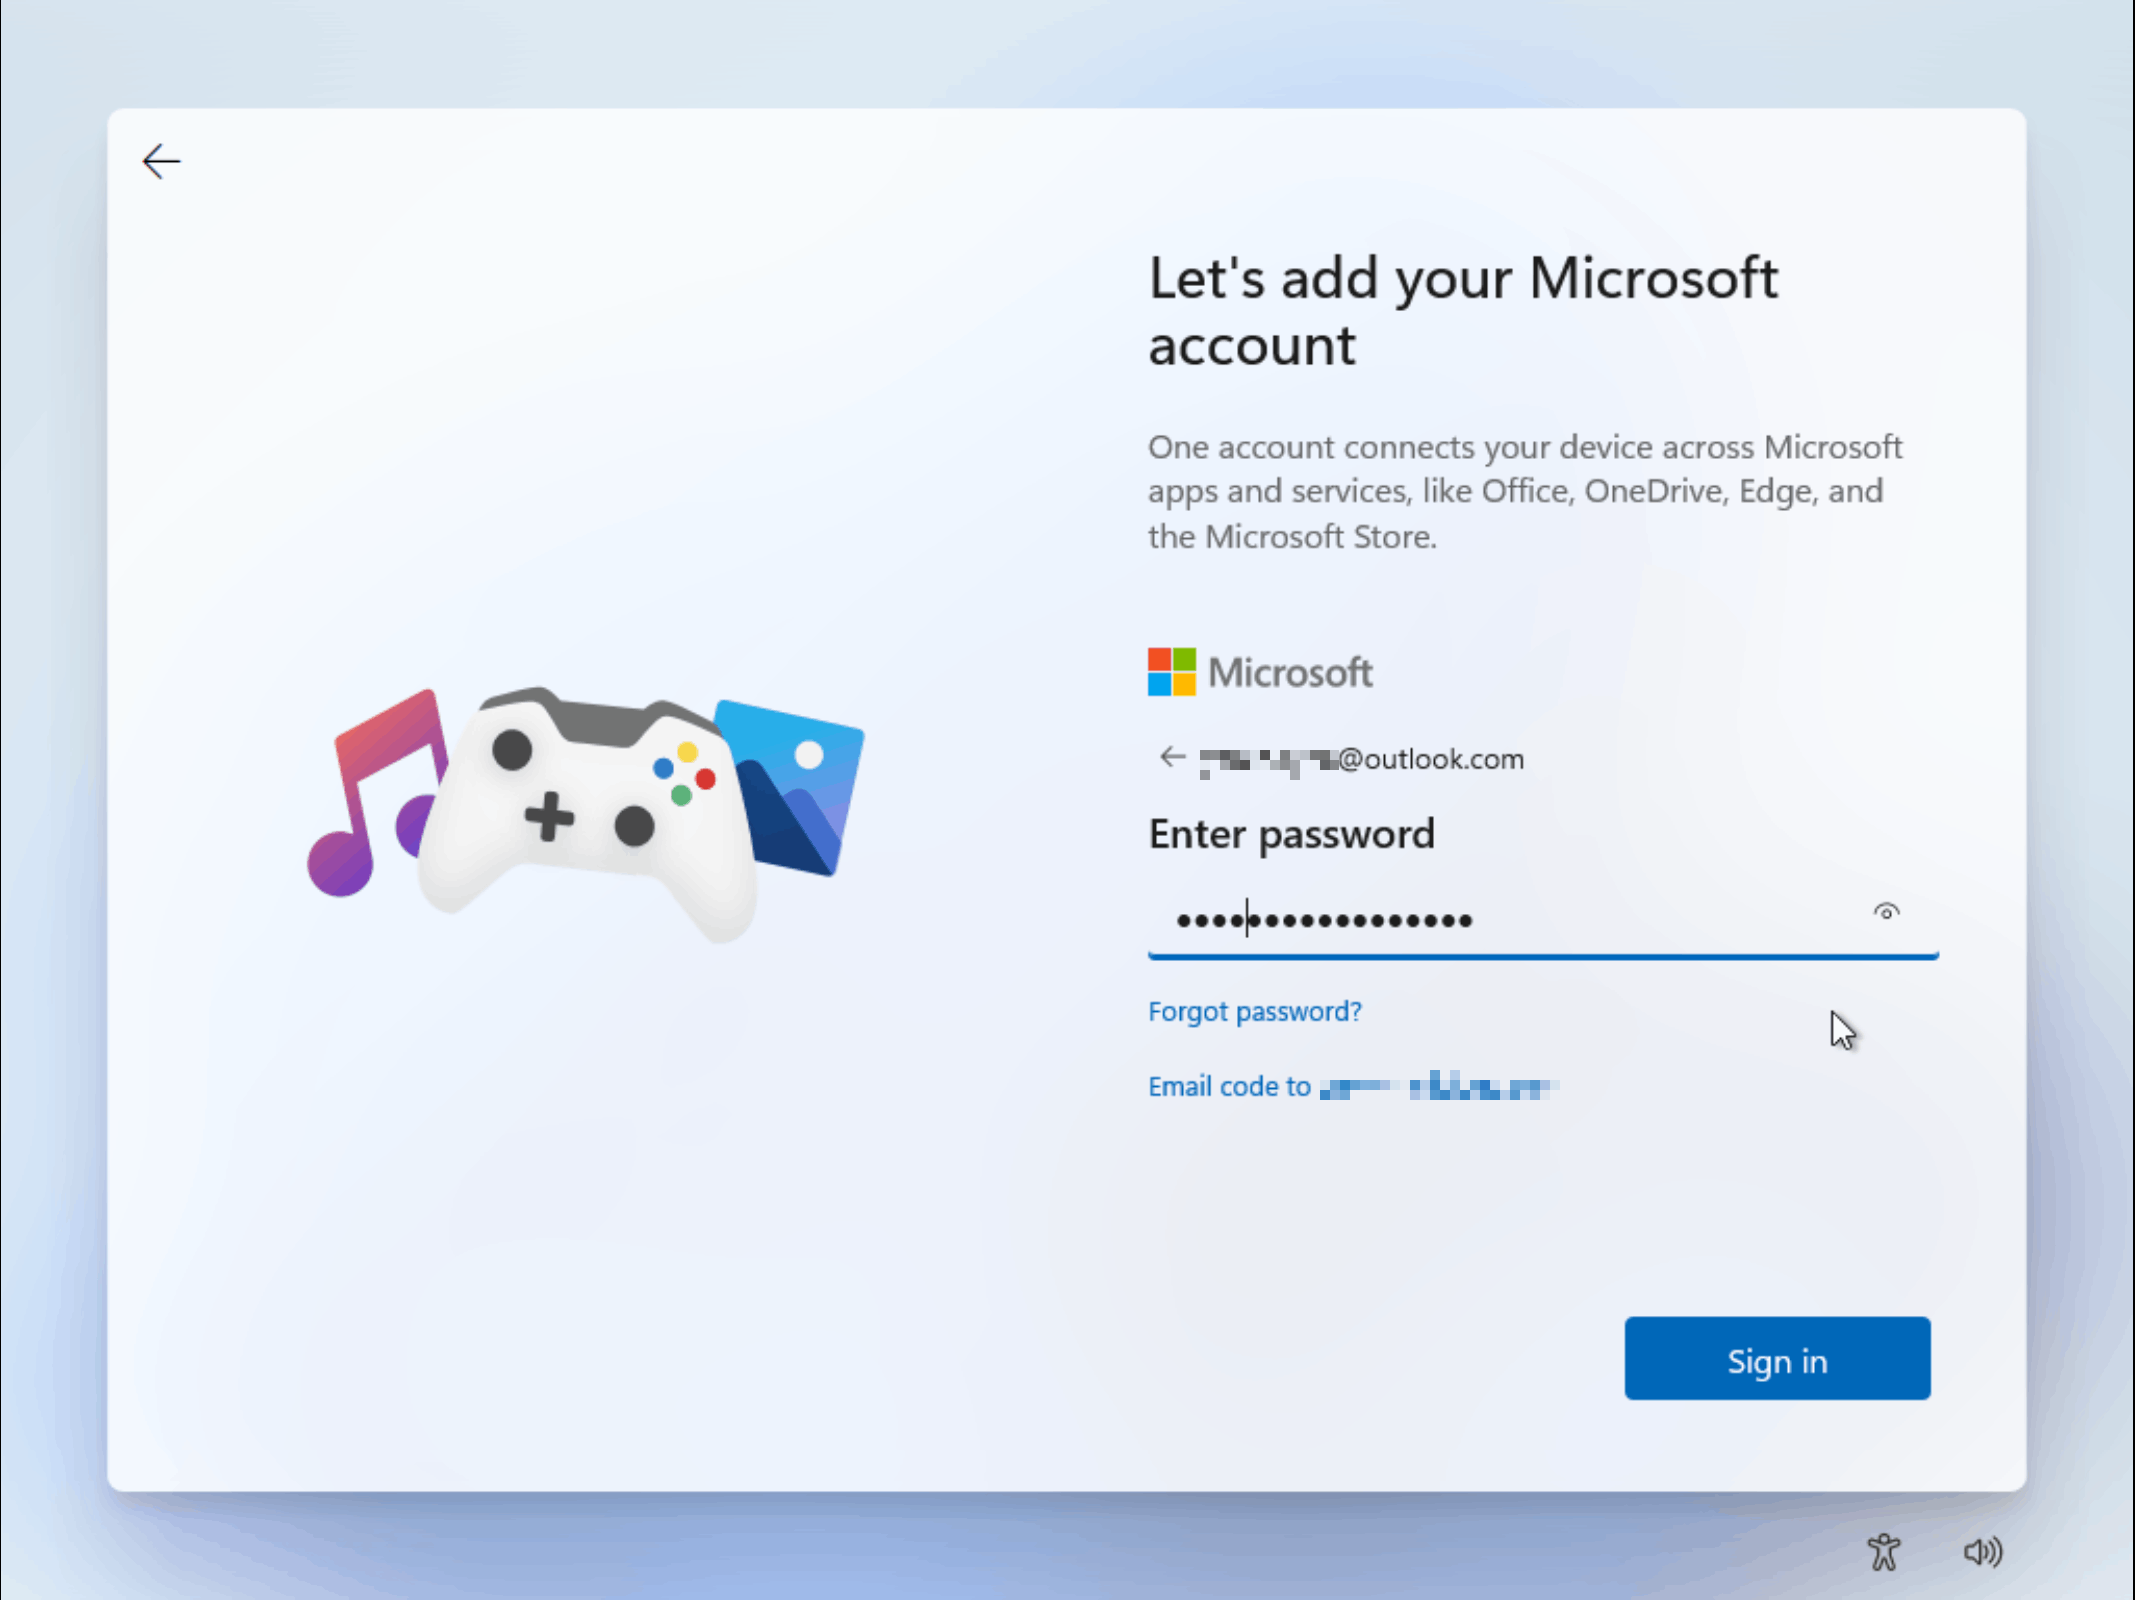
Now, I don't know about you, but even if I might be able to accept that Microsoft Account sign-in is mandatory to use Windows, the idea of not being able to name my user account or my home directory (which is notoriously non-trivial to rename after the fact) the way I want it really irks me. Therefore, there are various ways devised by the community to work around the OOBE interface, though Microsoft is playing the role of the cat in a perennial cat-and-mouse game against the sanity of its users.
One trick that worked for me was grabbing a "bypass nro"/"skip oobe" script from GitHub and running it from a prompt launched during the OOBE process. These scripts typically use the Windows unattend.xml mechanism to skip setup questions and create a user account directly.
You also probably want to follow the guided install process at least up to the point where you're properly connected to the Internet, since that likely entails installing the VirtIO drivers, once again from the virtual
virtio-win install discPost-install steps
Once the install is completed, updates are applied, the baby is bathed and changed, you should be greeted by the familiar Windows desktop.
You should now do all of the following, in no particular order:
- Activate Windows
- Remove the Windows installation ISO from your VM's devices
- Install the full VirtIO driver bundle for your system from the same
virtio-wininstall disc as before, using the appropriate .msi installer for your platform. You can then remove the corresponding ISO device from the VM configuration - Install graphics drivers for your specific GPU vendor, e.g. using the NVIDIA App for GeForce cards, as well as other relevant drivers for any passed-through devices
- To get better I/O performance and reduce jitter (particularly with HD Audio devices) make sure to enable MSI interrupts instead of Line-Based for devices that support them. This requires editing the Windows Registry, but it can be trivially done with the MSI Utility v3 from the Guru3d forums, or the fancier GoInterruptPolicy tool from GitHub; please read the corresponding documentation before using these tools
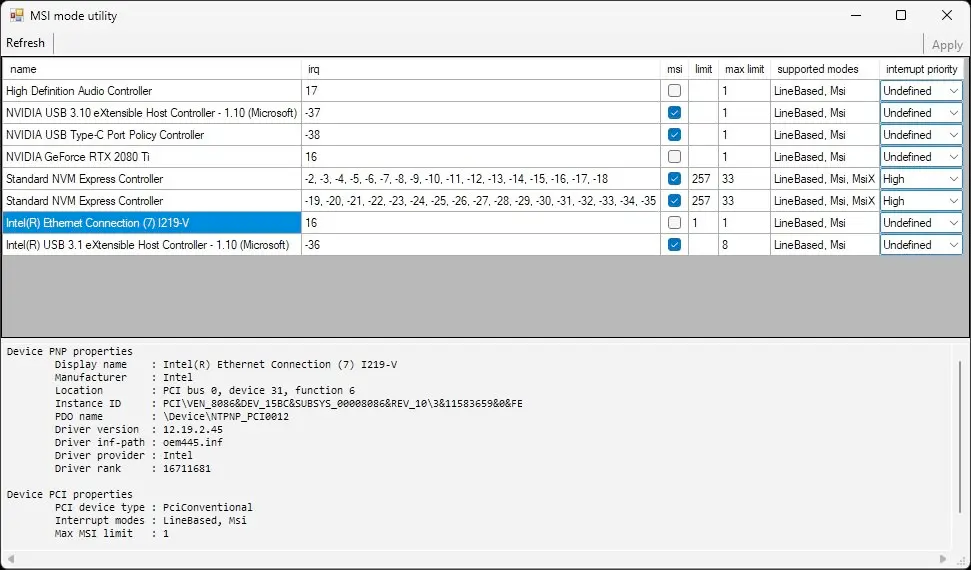
msi box next to every device that supports Msi is checked in MSI mode utility, then click "Apply" and reboot your system.- Ensure Virtualization-based Security is disabled: run
msinfo32, then check that its status reads Not enabled under System Summary; this is critical as VMs lose significant performance when this feature is enabled. Windows shouldn't enable this on VM installs, but it's something to keep in mind if for example you've migrated a baremetal install to use it with VFIO
And just like that, voila! Your system should now be stable, running and fully-functional. Time to install Steam, download a game, kick back and relax. You've earned this!
Closing Remarks
With this project I set out to answer two questions:
- Is GPU passthrough still possible with high-end consumer hardware in 2026?
- Does it make any sense?
The answer to the first question is a resounding yes, providing you chose your hardware wisely.
I may have splurged a bit on some of the components (such as the very overkill HX1500i PSU), but I fully stand behind my choice of motherboard and CPU. Having this many cores gives me adequate leeway to have both an excellently-performing server and a phenomenal gaming PC, on the same die. And the motherboard's impressive capabilities are put to the test by the I/O demands of what is effectively two machines in a trenchcoat.
In the future I plan to add an LSI SAS HBA card to expand my ZFS array beyond the meager 4 SATA slots on the Asus ProArt X870E-CREATOR, meaning I will have to make full use of all PCIe slots available on this system, leaving none uncommitted. This monster of a setup is only possible thanks to the massive PCIe bandwidth available on AMD's dual-chipset X870E platform, and the on-board 10 Gigabit ethernet NIC on the Asus board means I can do away with needing a dedicated PCIe 10 GbE NIC (though I would have preferred an SFP+ rather than RJ45 interface, but c'est la vie with consumer hardware).
Performance in games, after all the tuning, is pretty close to native. I won't go into detail as this isn't a benchmark article (and admittedly, I haven't booted into a native OS to test in a while) but as an example I get around 97% constant GPU utilization in The Witcher 3: Wild Hunt and have had no jitter in various other AAA titles, which is good enough for me. An early Cyberpunk 2077 test comparison between native and virtualized (prior to applying many of the optimizations described above) shows a ~8% slowdown, but I'd have to repeat this experiment now for it to be representative.
Predictably, CPU-bound compute scenarios seem to suffer from the VM overhead quite significantly, as is evident from Cinebench or similar benchmarks. I can live with that.
As for the second query: it really depends. My opinion is that by far, for the vast majority of consumers, including the "techie"-inclined, it's really NOT worth dealing with the hassle of such a setup.
Don't get me wrong: I'm glad to have this and I would build it all over again in hindsight. I think I still saved a bit of money compared to the alternative setup I initially wanted with two different machines (though—if I'm not girl-math'ing myself into this specific solution—I could have very much gotten away with a more minimalist setup and come out ahead, if anything in terms of power costs).
I'm huge on "software-defined" everything, from networking to living spaces, so the idea of my workstation also becoming an abstract box whose state and is defined through software, was extremely appealing to me. At one point while I was on vacation at my parents' place, I wanted to experiment with CUDA, so I shut down my Windows VM remotely, installed Ubuntu in a different (headless) VM, passed it the GPU and set up the CUDA environment over SSH; it was fantastic. It's also the ultimate management solution for remote gaming via e.g. Parsec: if your VM is acting up, just reboot it, no WoL, IPKVM or similar wonkiness needed. Want to play a sketchy mod or an .exe game downloaded from the web? Just clone your VM and run it isolated!
But all that is gained in terms of consolidation, isolation, flexibility, reduced noise and physical footprint (compared to running two separate systems), is arguably lost in terms of "Just Works" factor, countless hours of troubleshooting, writing on forums and anxiously waiting for a reply, DM'ing strangers on Reddit for advice on some real head-scratchers, seldom even pondering the very life choices that led to me attempting to square this particular circle with such expensive hardware.
It took a lot of time and learning pains to get to my currently working setup, but I'm glad for it. This was a highly formative and positive—if sometimes humbling—experience, both because I'm a keen tinkerer by nature—I revel in the challenge of turning a Can we? into a Yes, We Can™—and because it has taught me a lot about modern hardware architectures in practice, making me appreciate how little I know about the complexities, clever optimizations and low-level features that go into the complex hardware and software stacks of modern computing systems, starting from the Linux kernel and its various subsystems, up to PCIe software and hardware, CPU scheduling, memory and virtualization on (and of) a modern OS.
If the components of the modern hardware/software stack that make a normal PC run were the instruments of an orchestra, at times this project felt a lot like conducting a bunch of unruly musicians, with a seeming stubborness to go off-key and with every single string, woodwind and brass needing to be tuned by hand with no help from their players. But the final result is a beautiful concert, one that is truly mine.
Although I'm still going to need a PS5 if I ever want to play Fortnite with my friends.